Dell G5 5590 Battery & Thermal Paste Replacement
ID: 205499
Description: Over time, dust buildup and degraded thermal...
Steps:
- 1. Loosen the captive screws labeled A and B.
- 2. Unscrew screws 1–7.
- 3. Pry up the bottom cover from the hinge edge and remove it.
- 1. Pull straight up on the black battery pull tab to disconnect the battery cable.
- 2. Press and hold the power button several times to discharge any residual power.
- Caution: Always disconnect the battery before working on internal components.
- 1. Unscrew the battery mounting screws.
- 2. Lift the battery out of the laptop.
- Optional: The Dell G5 5590 can operate without a battery when connected to AC power, with no noticeable performance impact.
- 1. Unscrew screws 1–3 securing the right fan.
- 2. Disconnect the right fan cable.
- 3. Unscrew screws 1–3 securing the left fan.
- 4. Disconnect the left fan cable.
- Caution: Apply downward pressure while turning the screwdriver to avoid stripping the screws.
- 1. Use tweezers to remove large dust clumps from the fan blades.
- 2. Brush away remaining surface dust.
- 3. Blow out fine dust using cool air, directing airflow from inside to outside.
- Note: Do not use hot air.
- 1. Loosen the heatsink screws in the order 7–6–5–4–3–2–1.
- 2. Turn each screw a few rotations at a time.
- 3. Repeat the sequence until all screws are fully loosened.
- 4. Lift the heatsink straight up and remove it.
- Caution: Uneven loosening can damage the CPU or GPU.
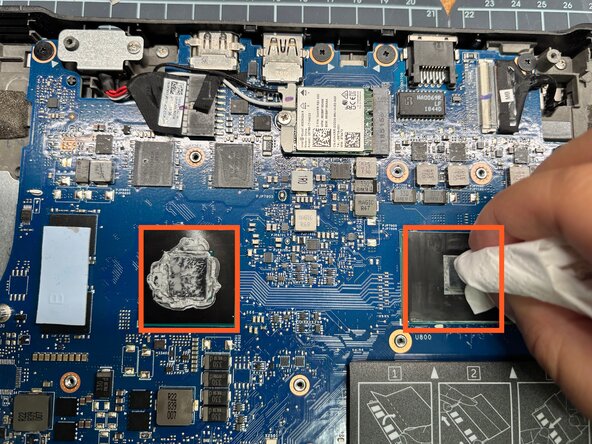
- 1. Wipe the old thermal paste off the CPU and GPU.
- 2. Clean the heatsink contact surfaces until no residue remains.
- 1. Apply a thin straight line of thermal paste to the CPU.
- 2. Apply an X-shaped pattern of thermal paste to the GPU.
- Note: Do not spread the paste manually unless required by the paste manufacturer.
- 1. Place the heatsink back into position.
- 2. Tighten the screws in the order 1–2–3–4–5–6–7.
- 3. Tighten each screw a few turns at a time until fully secured.
- 1. Reconnect the right fan cable.
- 2. Secure the right fan with its three screws.
- 3. Reconnect the left fan cable.
- 4. Secure the left fan with its three screws.
- 1. Place the bottom cover back into position without tightening the screws.
- 2. Power on the laptop and confirm the system boots normally.
- 3. Power off the laptop.
- 4. Fully tighten captive screws A and B.
- 5. Tighten screws 1–7 to secure the bottom cover.