Guide 2: Nespresso EN 90 A Coffee Maker Electronic board detail, common faults, and button detail.
ID: 213063
Description:
Steps:
- On this circuit board, which is by the way very repairable, the main failure is the central capacitor, which remains low in capacitance, causing the machine to have the green cup button off or almost off and flickering.
- The solution is to replace the capacitor; it is a 470 nF = 0.47 µF / 275 V, and you can install an identical one or one with a higher capacity, such as 680 nF.
- Other problems that the PCB might have are a short circuit of the varistor (it would look destroyed and burned), marked in orange, or an open circuit in the 150 ohm input resistance, marked in yellow. Other components to keep in mind, although they are less likely to fail, are the two capacitors I have marked in purple.
- Videos I have dedicated to the capacitor topic:
- Performing reverse engineering, since the electrical diagram is not available, we observed the triac that controls the PUMP water pump; it is very rare for it to short-circuit and connect the water pump permanently, but it could happen PH48 6D BT134W
- NEUTRAL input line = NEUTRAL the trace acts as a fuse, redundant both at the trace level and at the 150 ohm power input resistance level.
- The triac that powers the boiler's resistance is a component that can fail, although I see this board as quite well designed, and the heat sink it uses is quite substantial, so it shouldn't cause any problems—or rather, I haven't known of any issues with it. With a multimeter, we can see that the central terminal powers the HEAT output.
- The problem I have observed with this machine is the white cup button, which contains an internal green LED; this button sees much more use than the red power button (since the red one is used much less, as we only press it once to turn it on).
- The green button is used more often to stop or to make several coffees in a row, so its wear is greater; said button fails when the PCB track gets dirty (it becomes stiff), so we press with more force and end up breaking the rubber.
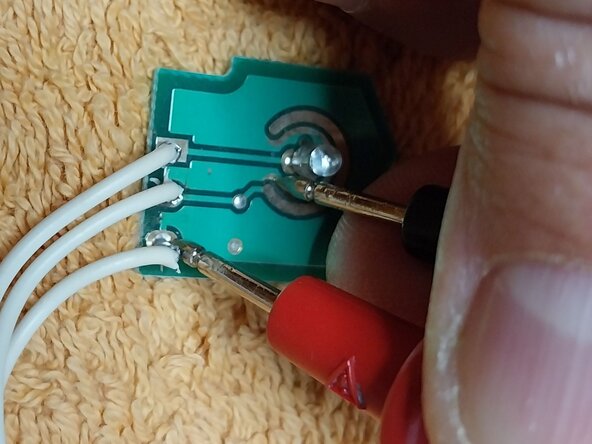
- To test the machine with the button removed, we can briefly touch the two tracks together with a metal object (a flathead driver bit) or we can bridge the center cable and the right side that I marked in the photo.
- Another problem the button has is that the rubber breaks at the base due to use, allowing dirt to penetrate more easily.
- The LED trace is clear to identify, but the other 2 are not as clearly identifiable. Here I show how I identified each one; if the traces are not shiny, they will not make good contact. They can be cleaned with fine sandpaper or an ink eraser.
- When the button lights up green, but the machine does not start when pressed, in 99% of cases the problem is due to dirt on the metal traces or the black rubber of the button.
- Video I have dedicated to the subject of the button, it is a different brand but the mechanics are the same:
- Other guides in this series: DeLonghi Nespresso EN 90.A