Gigabyte Sabre 15 Laptop RAM Replacement
ID: 213460
Description: This guide will help with replacing or...
Steps:
- Disconnect the laptop charger. Close the lid and turn the laptop over so that it is resting on its lid on your surface.
- Using the iFixit screwdriver with a 000 tip, remove the 12 screws from around the base
- There are two sliding switches on the battery that both been to be in the open position to allow the battery to be removed
- The left hand switch is spring-loaded and will need to be pushed to the right and held
- The right hand switch is a simple mechanical switch, slide it to the left to unlock
- Use a finger nail to get in the recess to lift the front edge of the battery up
- Rotate the battery as though it is hinged until it points straight up, then lift the battery away
- The first time it comes to removing the base of the laptop is very intimidating - it's well secured and doesn't seem to give easily
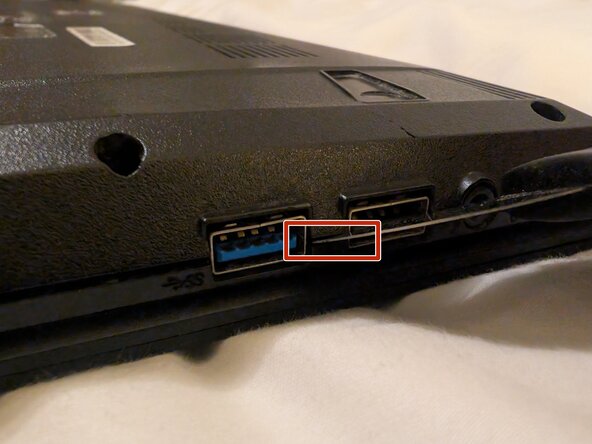
- I used a Jimmy tool, however any of the prying tools will work well, you just need something with a reasonably fine tip / head on it.
- Start between two connectors (the two USB-A ports on the right-hand side as shown in the image), gently insert the Jimmy in the seam where the top- and bottom-lids meet between the two connectors and gently twist to help get the Jimmy deeper.
- You'll only need to be in a few millimetres before the chassis will split apart.
- Then work your way around the entire perimeter.
- Job done!
- There are a pair of slots for RAM, these are located in the lower-middle area of the motherboard
- Each memory module has a pair of retaining arms that clip in to each side. In order to remove an existing module, or to easily get a module in these arms need to be released.
- If there is already a memory module in, then gently press the module down slightly and use your thumbnail to gentle pry the arm away by just a millimeter or two
- Then release the pressure of the memory module - you will see that the arm is now out (and below) the retaining slot.
- Repeat this for the opposite arm (you'll need to do both arms simultaneously!
- Once both arms are clear, the memory module will want to naturally pop-up
- The module can now be removed