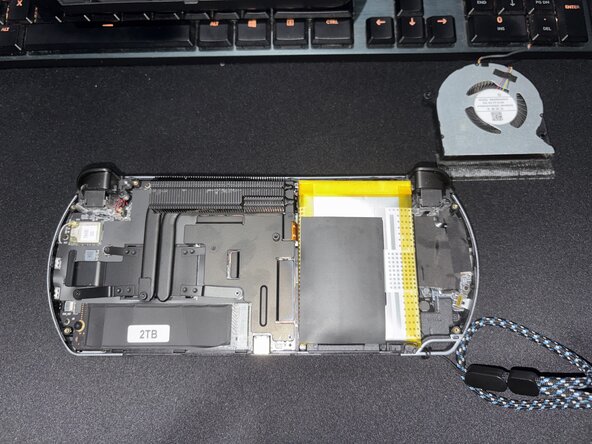
GPD WIN 4 (2023) Battery Replacement
ID: 213484
Description: I recently encountered a spicy pillow (swelling...
Steps:
- From the bottom of the device (the side with a single USB-C port and not with the Occulink port) pry off the silver band. this is the only glued part.
- Remove the 2 screws on the right hand side of the device (if the screen is facing away from you) and the 6 screws from the underside.
- NOTE: if the battery swelling is significant this will pop open on its own, please take care.
- Using your pry tool, open the bottom and top on the case with the screen face down, there are 2 cables, one on the left and one on the right, one is for Wi-Fi the other is the back shell buttons. these will need to be dissconnected.
- There are 2 screws holding the fan in, these have a wide head, and are located on the left and right of the fan, and the cable towards to bottom.
- The fan also has a plastic tape/glued sheet to direct air though the heatsink, you can leave it on the fan and pry it off the heatsink using the fan.
- there are 3 screws in the main heatsink, left, top and bottom that have to come out.
- Once the screws are removed the heatsink can come out exposing the battery connector.
- Next is the hard part, disconnect the battery connector, like a little Lego, then carefully pry the battery from the case, this has double sided tape with no removal strips. I used an old sim carrier card (the smooth side)
- Once the battery is out, this is the perfect opportunity to replace the SSD and remove dust from the fan and heatsink.
- Now the home strech
- Install the new battery, this can be tricky as some 3rd party batteries don't line up 100%, my battery ribbon has a slight twist in it to get the angle right.
- Now reverse the order of operations
- reinstall the heatsink and 3 screws, careful not to misalign the thermal pads
- reinstall the fan with it's 2 screws, ensure the tape is on the heatsink and fan and the cable is connected
- Connect the back shell, and the 2 cables, Wi-Fi and buttons
- snap closed, install the 8 screws, 2 from the bottom and 6 on the back
- reattach (if the glue works or apply new glue) the silver edging strip