Altyk Le petit PC portable L14 LCD Screen Replacement
ID: 219199
Description: Replacing the LCD screen on an Altyk L14 laptop.
Steps:
- Turn your machine over so that the bottom is facing you.
- You have 10 screws facing you:
- 8 identical short Phillips screws (PH000)
- 2 identical long Phillips screws (PH000) in the corners near the clutch hinges
- Once the screws are removed, you can pry up with an opening pick as shown in the second photo. There is no risk of breaking any snap fits; there are none.
- Locate the battery connector.
- There are two ways to remove the battery:
- Either use plastic or ceramic tweezers to separate the connector from the motherboard by using the corners of the connector as indicated in red.
- Grasp the battery wires shown in blue and pull gently toward you to disconnect the battery.
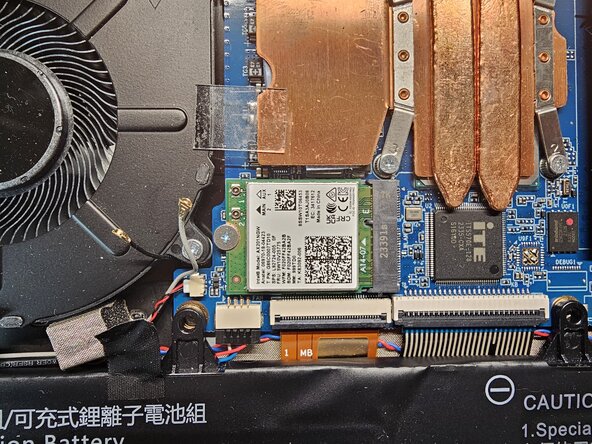
- Remove the transparent antenna protective shim
- Disconnect the antennas from the Wi-Fi card
- Free the antennas by moving them to the left side
- Remove the tape over the connector and disconnect the cable
- Free the cable from the plastic notch
- Position the cable to the right to clear your workspace
- Open the display to 90° before tackling the clutch hinges (this will allow you to remove the display more easily).
- Remove the three screws from the left side and right side. Be careful to prevent everything from falling at once: place a hand between the display and the keyboard while removing the last screws.
- Slide the hinge cover to the right; you will see that a small gap has been created, as shown in photo 2.
- Once it is slid over, you can grab the hinge cover from the left and remove it.
- The display bezel is a fairly thin plastic film.
- We recommend sliding an opening pick from the LCD toward the edge, which will make it easier to separate the display bezel. Then, you can work your way around the display to remove it completely, as shown in the last photo.
- Locate the "Pulltab" adhesive base strip that secures the screen.
- Grab the pull tab and pull until it is completely removed. Feel free to hold the screen during the operation to prevent it from coming toward you suddenly. Do the same on the left side and the LCD will be free.
- Position the panel facing you so you can see the connector at the bottom of the LCD panel.
- Remove the tape securing the connector to the LCD panel and pry up the metal lever underneath.
- You can now use the lever, as shown in the 3rd photo, to pull and slide the ribbon cable out of its connector; the panel is now free. You can install the new one and follow the guide in reverse to reassemble the machine.