Majority Eddington portable DAB radio Battery Replacement
ID: 219446
Description: The Majority Eddington portable DAB/FM radio...
Steps:
- Remove three 6mm sself-tapping screws from the base.
- Remove a 6mm machine screw from the back, and withdraw the aerial
- Remove three 9mm self tapping screws behind where the aerial sits in its closed position.
- Remove the back. A jimmy or thin spatula is useful for initially prying it open.
- Unsolder the battery connections from the main board using a soldering iron with a fine tip. If the solder doesn't melt easily, adding a small amount of leaded solder will immediately help.
- The two solder connections for the battery are close together. Take great care not to create a solder bridge between them. Should you have any doubts about your soldering skills, cut one of the battery wires so that it won't matter if you create a short between the solder pads.
- The battery is glued to the back. Insert a battery removal tool or a credit card under one end and ease it up gently until the battery is free.
- Take your time with this step in order not to damage the battery, potentially causing a fire hazard. At first it may seem as though the battery isn't lifting at all, but it will do in its own time if you maintain constant pressure. The glue will give more readily in a warm environment.
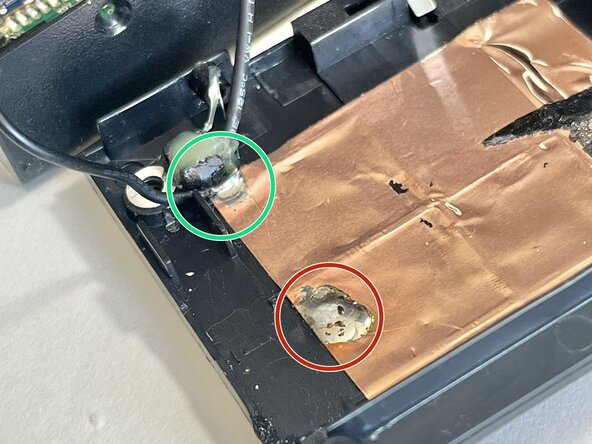
- Beneath the battery is a copper foil shield with a solder connection. The new battery may lie flatter if you move the solder connection from its original position (circled in red) to the corner of the foil (circled in green).
- The new battery may come with a JST connector. If so, cut this off one wire at a time so as not to short the battery with the cutter. Strip just a couple of millimetres of insulation from each wire and tin them with solder. Take care not to let them touch.
- Fit the new battery in position. You can secure it with double sided tape, but this is hardly necessary if you're fitting a 803860 battery instead of the original 695144 as it's a tight fit. After reassembly, a rubber pad on the main circuit board will hold it in place.
- Remove excess solder from the battery solder pads and add a rounded (but not excessive) blob of fresh solder to each.
- Note that the battery solder pads are labelled BAT+ and BAT-. Solder the black battery wire to the BAT- pad, then the red wire to BAT+. It should not be necessary to add more solder
- Take great care not to create a solder bridge between the pads. If you have any doubts about your soldering ability, have a pair of wire cutters easily to hand. In the event of creating a short you can't instantly correct, snip one of the wires. You can solder the two cut ends together later and cover the join with tape.
- Inspect the solder joints closely. Check that they are clean, well made and without any wire or solder whiskers which might later create a short.
- Replace the back of the radio, inserting the three 6mm screws in the bottom and the three 9mm screws in the top.
- Finally, insert the aerial, ensuring that the screw at its base is facing outwards so that it can be tightened if the aerial becomes floppy. You will need to manipulate the aerial in order to align the threaded retaining screw hole with the hole in the back of the radio and so that the retaining screw catches the thread.