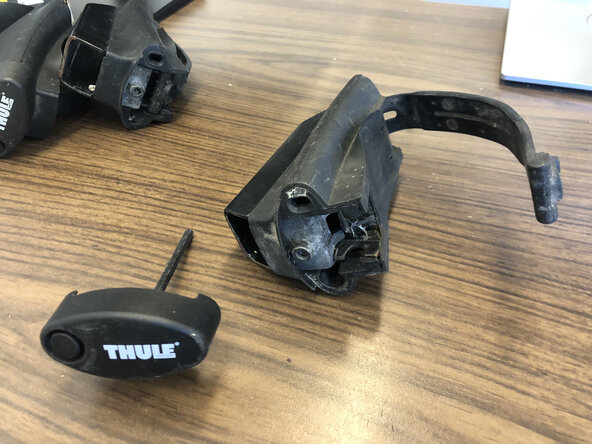
Thule Rapid Crossroad 450 footers Teardown
ID: 219814
Description: The Thule Rapid Crossroad 450 footers are a...
Steps:
- Picture - Set of Thule 450 Crossroad Railing Foot Kit: purchased used (Facebook Marketplace). Original retail packaging. Includes Thule 450 Roof Rack Installation Manual, (4) 450 Crossroad Railing Foot, (3) End Cap, and a Hitch Wrench/Bottle-Opener not part of kit. Kit would include (4) End Caps for the Square Bars as indicated in the manual.
- Step 1 - Remove the End Cap from the footer by placing your finger behind the flat horizontal lip below the End Cap under the Thule logo. You will pull it forward towards you and it should loosen and pop off like image 2.
- Step 2 - Start loosening the hex bolt as depicted in image 3 by placing the hex tool attached to the End Cap. You are going to remove this bolt completely and may need some WD-40 as the bolt may be rusted solid if it was not lubricated as a preventative measure by the prior owner.
- Step 3 - with the Hex Tool inserted to remove the Hex Bolt - Turn left to loosen it.
- Step 3a - if you flip the footer to view the back side the end of the bolt will be visible along with the cross dowel nut or dowel nut. The dowel nut is held in place by two metal band hoops securing each side of the dowel nut. Remove the dowel nut from the two metal band hoops.
- Step 4 - Now you need to remove the two metal band hoops which are rubber coated with latching pins on the other end. This can be seen in the picture.
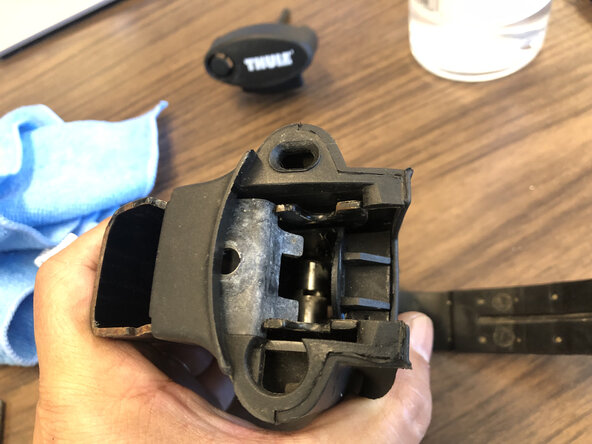
- Step 4a - looking from the front end where you see the hole where the Hex Bolt was removed from you must push down the plastic sleeve. The plastic shell just above the bolt hole and extending to both side is what you are going to push down.
- Step 4b - When the plastic shell is loosened it should look like image 3.
- Step 5 - As you slip off the plastic shell you will need to slide out the two metal band hoops rubber coated strap. It should look like image 3 after you remove the plastic shell.
- Disassembly Complete - you should have the following parts after being cleaned. Metal Plate which is the hole where the Hex Bolt screws into will fall out during disassembly. The orientation when reinstalling should be with the two tabs pointing down. Just keep this in mind when reassembling - see image 2 for a visual.
- Reassembly is just putting it back together in reverse order. I will later on put in a few helpful tips if people are experiencing issues getting it back together.
- Maintenance Tip: Use WD-40 to keep the Hex Bolt and dowel nut fro rusting. An alternative is Copper Anti-Seize (e.g., Permatex Anti-Seize).