Oakley Holbrook OO9102 Lens Replacement
ID: 220276
Description: The Holbrook is Oakley's best-selling lifestyle...
Steps:
- Before anything else, check the inside of your Holbrook temple arm. Look for the model number and size: OO9102 followed by a color code and then either 55 or 57. If you're not sure, measure the existing lens horizontally at its widest point.
- The 55 mm Holbrook is the standard size. The 57 mm is slightly wider. Lenses between the two sizes are not interchangeable.
- Hold the frame in both hands with the front of the frame facing you and the lenses pointing away. You want a solid grip on the outer frame (the parts above and below the lens near the temple hinge) while keeping your thumbs free to work on the lens.
- The key release point on the Holbrook is the inner edge of the lens — the part closest to your nose when wearing the glasses. This is where the lens locks into the frame.
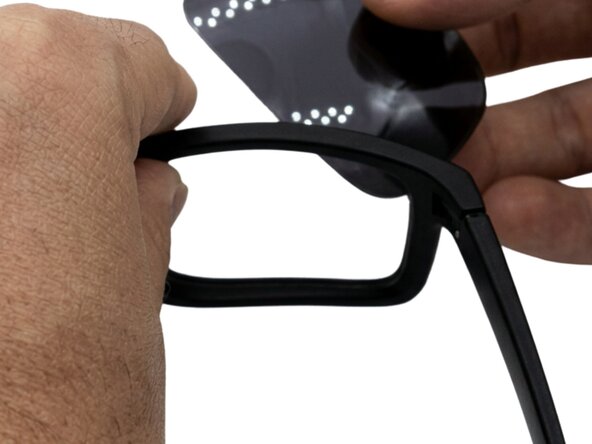
- Place one thumb on the outer lower corner of the lens (temple side) and press inward toward the nose bridge. At the same time, your other thumb can gently push the inner edge of the lens (nose bridge side) outward.
- The O Matter frame will flex slightly, and the lens will pop free from the inner retaining ridge near the bridge. You'll feel the "click" of it releasing — it's very satisfying.
- The lens will pivot outward from the inner edge, hinging at the outer temple edge. Don't yank it — just let it swing free once it's released.
- Once the inner edge is free, the lens will swing outward away from the nose bridge. Hold the lens with your other hand to catch it and lift it gently out of the outer retention channel (the part near the temple). It requires almost no force.
- Set the lens aside on a microfiber cloth, lens side down. The Prizm coating is durable but worth protecting.
- With the lens out, wipe the inner channels of the O Matter frame with a dry microfiber cloth. Pay attention to the small retaining ridge near the nose bridge — dust or debris here can prevent the new lens from seating fully. A clean channel means a secure fit.
- Hold the new lens with a microfiber cloth (your fingerprints on a fresh Prizm lens will be obvious and annoying). Position the outer edge of the new lens into the outer channel of the frame first — this is the temple side. Seat it firmly into the outer groove.
- Then, holding the outer edge in place, flex the frame slightly and press the inner edge of the lens (nose bridge side) up and inward into the retaining channel. You should feel a definite click when it locks.
- Work the lens around its perimeter with your thumbs to make sure every section is fully seated.
- Check the lens from every angle — front, top, side, bottom. The lens should be flush with the frame with no gaps, no twisting, and no visible edge sticking out. The Oakley "O" icon should be at the correct position (lower outer quadrant of the lens on a standard Holbrook).
- Flex the frame gently — the lens should stay completely solid. If it shifts or pops out easily, the inner retaining edge isn't fully engaged. Remove and repeat step 6.