Disassembling Wet and dry vacuum cleaner HS-6000 Case
ID: 220430
Description:
Steps:
- Pull the black nose off of the body of the vacuum, by pushing in the button closest to the nose.
- Use a Philips head screwdriver to remove the three screws.
- Take of the label.
- Take of bottom case
- The backside have right and left each a single nose. It should be easily click off.
- This step is maybe optional, but it's more easy for the next step. Otherwise your metal screwdriver will deflected by the attraction of the magnetic parts of the motor.
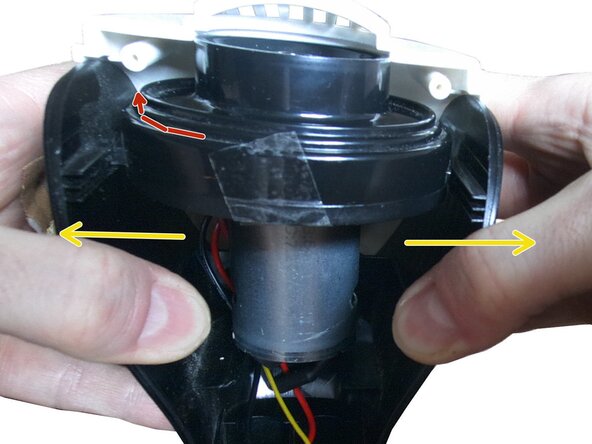
- Press the sides out.
- At the same time: Push out the motor to the top. Or much bedder: twist the motor to the left a bit and pull it to the top out.
- Precaution measure: Put some tape on the ventilator-case, because it very easy felt off. This will prevent hurt, when your accidentally switch on the machine.
- Use a Philips head screwdriver to remove the three screws. (Image defect: please take off the motor before)
- Unlock the two noses (right and left). ((maybe: pull the black case off at the same time a little bit))
- Pull the case of:
- Be careful: Do not break these noses or the case here.
- The motor is label: RS: 540-5715 DC: 7.2V
- Measured values of an old device with weak battery: High speed (II) : ~ 8A (starts short with 12A) 6.7V ;; Normal speed (I) : ~ 4 - 6A <5.4V ;; Automatically switched off at <=4.3V
- The battery is labelled: Li-Ion 18650 2200mAh 7.4V (= this are two 18650 batteries with each 3.6V in series). There is a separate guide for replacing the battery.
- Measured voltage: <= 6.3V LED blinking ; <= 5.6V automatic switched off
- The PCB-Board is labeled: HD-HS-X13 ; It is fixed by a single screw.
- If you find a loose rubber: It belongs above the LED.
- At the motor are inductors soldered (hidden below the black heat shrink tube), so please do not pull too much on that cables.
- Power supply: Model HS-XZ0960-0500 ; 9.6V 500mA ; DC-Plug 5.5 x 2.5 mm ; Contacts: outer contact is minus (GND) , inner contact is plus (Vn+).
- End of.