iPad Air 7 13" Battery Replacement
ID: 238684
Description: Follow this guide to remove and replace a...
Steps:
- Allow your iPad's battery to fully drain before starting this repair. A charged battery may catch fire if damaged during the repair.
- Unplug any cables and fully shut down your iPad.
- This guide is written with the iPad in portrait orientation.
- Glass shards can complicate disassembly—or worse, cause injury. If your iPad has a cracked screen, follow this step.
- Wear safety glasses to protect your eyes from any glass shaken free during the repair.
- Apply strips of packing tape to the cracked glass until the whole screen is covered—this will help keep the glass contained and allow the suction cup to stick to the screen.
- Only cover the glass itself—don't stick any tape to the frame.
- The next three steps demonstrate the Anti-Clamp, a tool we designed to make the opening procedure easier. If you aren't using the Anti-Clamp, skip down three steps for an alternate method.
- Pull the blue handle backwards to unlock the Anti-Clamp's arms.
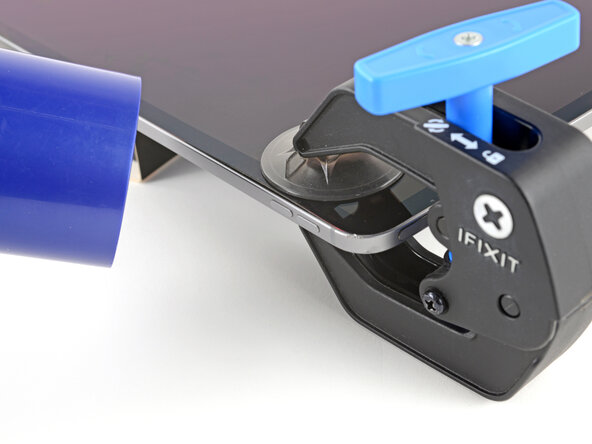
- Position the suction cups on the right edge near the volume buttons—one on the top and one on the bottom. Make sure the arms don't block the volume buttons.
- Place an object under your iPad so it rests level between the suction cups.
- Hold the bottom of the Anti-Clamp steady and firmly press down on the top cup to apply suction.
- Pull the blue handle forward to lock the arms.
- Turn the handle clockwise 360 degrees or until the cups start to stretch.
- Make sure the suction cups remain aligned with each other. If they begin to slip out of alignment, loosen the suction cups and realign the arms.
- Use a hair dryer or heat gun to heat the screen area between the suction cups until it's slightly too hot to touch.
- For complete instructions on how to heat with a hair dryer, check out this guide.
- Improper use of a heat gun can destroy the screen and/or battery—review this guide for instructions. To prevent screen damage, keep your heat source moving rather than focused on one spot.
- Wait one minute to give the adhesive a chance to release and present an opening gap.
- Insert an opening pick no deeper than 3 mm when the Anti-Clamp creates a large enough gap.
- If the Anti-Clamp doesn't create a sufficient gap, apply more heat to the area and rotate the handle clockwise half a turn.
- Don't crank more than half a turn at a time, and wait one minute between turns. Let the Anti-Clamp and time do the work for you.
- Remove the Anti-Clamp and skip the next two steps.
- The next two steps show how to use a suction handle to create an initial gap.
- Use a hair dryer or heat gun to heat the top-right corner of the screen until it's slightly too hot to touch.
- For complete instructions on how to heat with a hair dryer, check out this guide.
- Improper use of a heat gun can destroy the screen and/or battery—review this guide for instructions. To prevent screen damage, keep your heat source moving rather than focused on one spot.
- Apply a suction handle to the right edge of the screen above the volume buttons.
- Pull up on the suction handle with firm, constant pressure to create a gap under the screen.
- The adhesive holding the screen in place is very strong. If you're having a hard time, be patient, apply more heat, and try again.
- Insert an opening pick into the gap, no deeper than 3 mm.
- Heat the entire top edge of the iPad until it's slightly too hot to touch.
- Insert another opening pick under the top-right corner of the screen.
- Slide the pick along the top edge to separate the adhesive, making sure not to insert it deeper than 6 mm.
- If you’re having trouble, apply more heat—not more force.
- Leave the pick inserted in the corner to prevent the adhesive from resealing.
- Before you separate the left edge, note the following:
- Four screen cables run along the left edge. Don't insert your pick deeper than 2 mm near the cables to avoid damaging them.
- The adhesive widens between the cables. You may need to slice slightly deeper in these areas to separate the adhesive.
- The second image shows where the screen cables sit relative to the iPad's bottom edge. Measure and mark these areas with tape, and work carefully around them in the next step.
- Heat the left edge of the iPad until it's slightly too hot to touch.
- Insert another opening pick under the top-left corner of the screen.
- Slide the pick along the left edge to separate the adhesive.
- Don't insert the pick deeper than 2 mm near the screen cables to avoid damaging the screen.
- Leave the pick inserted in the corner to prevent the adhesive from resealing.
- Heat the bottom edge until it's slightly too hot to touch.
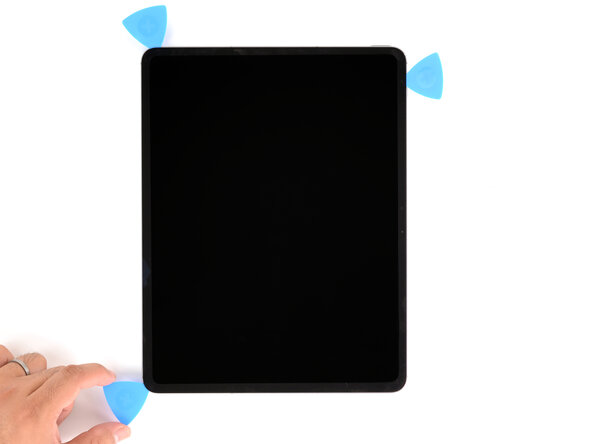
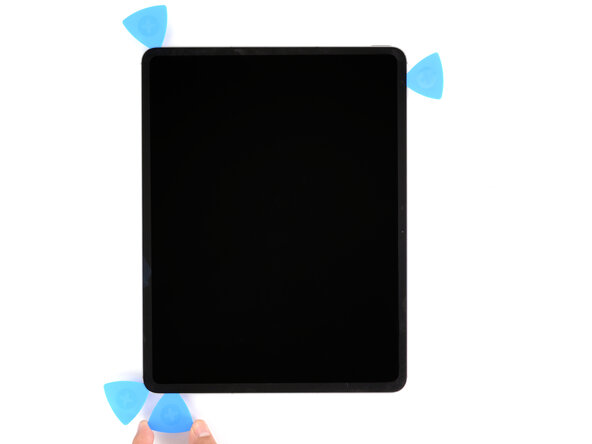
- Insert an opening pick under the bottom-left corner of the screen.
- Slide the pick along the bottom edge to separate the adhesive, making sure not to insert it deeper than 6 mm.
- Leave the pick inserted in the corner to prevent the adhesive from resealing.
- Before you separate the right edge, note the following:
- The adhesive contours around the front sensor components and the magnets.
- There's a front microphone cable close to the front camera. Don't insert your pick deeper than 2 mm around this area to avoid damaging the cable.
- Heat the right edge (the edge with the front camera) until it's slightly too hot to touch.
- Insert an opening pick under the bottom-right corner of the screen.
- Slide the pick along the right edge to separate the adhesive, making sure not to insert it deeper than 2 mm near the front microphone.
- Don't try to remove the screen yet, as several fragile ribbon cables still connect it to the iPad. Take care not to strain the cables as you work.
- Carefully pivot the top-left corner of the screen down to reveal the front microphone connector cover on the right edge (near the front camera).
- If the screen feels stuck, heat the stuck areas and use an opening pick to carefully separate the residual adhesive.
- Grab the top-left and bottom-right corners of the screen.
- Use a JIS 00 screwdriver to remove the 1.2 mm‑long screw securing the front microphone cover.
- Small iFixit Phillips bits are designed to work with JIS screws. You can try Phillips drivers from other manufacturers, but you risk stripping the screw.
- Remove the front microphone cover.
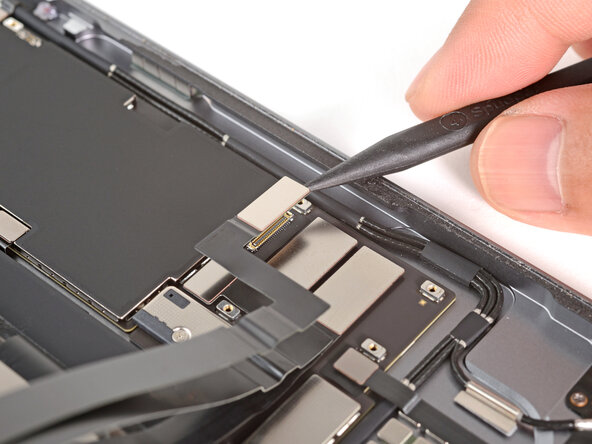
- Use the point of a spudger to pry up and disconnect the front microphone connector.
- During reassembly, this can be tricky to reconnect. Use tweezers to align the connector and press gently until it clicks. Don't force it, or you'll damage the connector.
- Slowly lift the right edge of the screen and flip it over itself, while moving the left edge over to keep the cables from straining.
- Lay the flipped screen on the iPad, being careful not to strain the connected cables.
- Use a JIS 00 screwdriver to remove the four 1.2 mm‑long screws securing the screen connector cover.
- Remove the screen connector cover.
- Use the point of a spudger to pry up and disconnect one of the screen press connectors.
- Use a spudger to pry and disconnect the remaining three screen press connectors.
- To reattach press connectors during reassembly, carefully align and press down on one side until it clicks into place, then repeat on the other side.
- Don't press down in the middle. If the connector is misaligned, the pins can bend, causing permanent damage.
- Remove the screen.
- During reassembly, follow this guide to install replacement screen adhesive.
- Use a JIS 00 screwdriver to remove the 1.8 mm‑long screw securing the battery connector.
- Six stretch-release adhesive strips hold the battery in place:
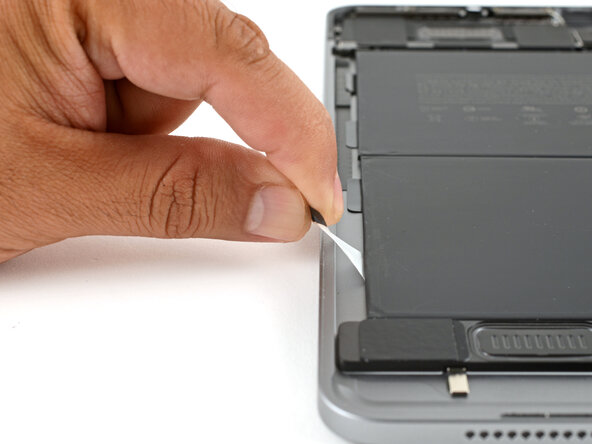
- Five strips secure the battery cells to the frame. Each has a black pull tab along the left edge of the battery.
- A narrow strip secures the battery board at the bottom of the battery.
- Firmly grab a stretch-release adhesive pull tab with your fingers.
- Slowly pull the strip straight away from the battery, keeping a low angle to the frame.
- If you have blunt tweezers, grab the strip and wrap it around the tips as you pull the adhesive out.
- Give the strips plenty of time to stretch. If a strip breaks off, try to retrieve it and continue pulling.
- Repeat the procedure to remove all six strips.
- If you've successfully removed all six stretch-release adhesive strips, skip down four steps.
- If any strips broke off, follow the next steps to remove the adhesive remnants.
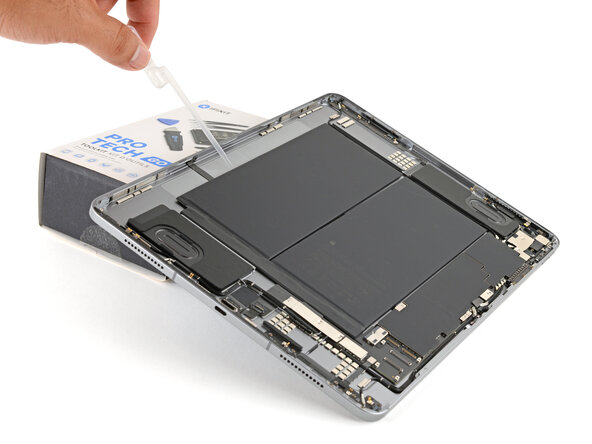
- Elevate the left edge of the iPad by setting it on a stable object.
- Apply several drops of high concentration (>90%) isopropyl alcohol to the left edge of the battery, near the broken adhesive strips.
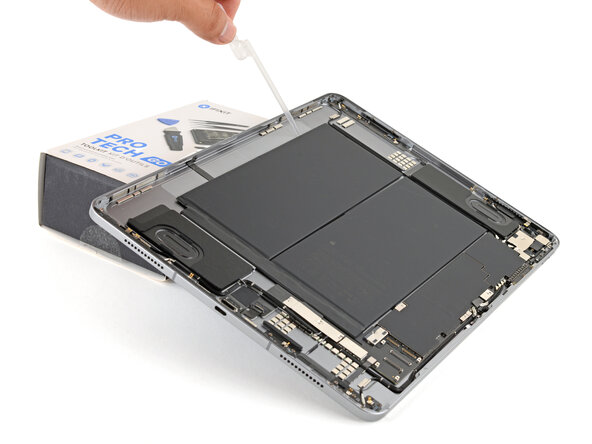
- Apply several drops of isopropyl alcohol to the center seam of the battery, near the broken adhesive strips.
- Wait one minute for the alcohol to soften the adhesive.
- Slide a plastic card under the battery to separate the adhesive remnants.
- Don't puncture or bend the battery. If it feels stuck, apply more isopropyl alcohol to help soften the adhesive.
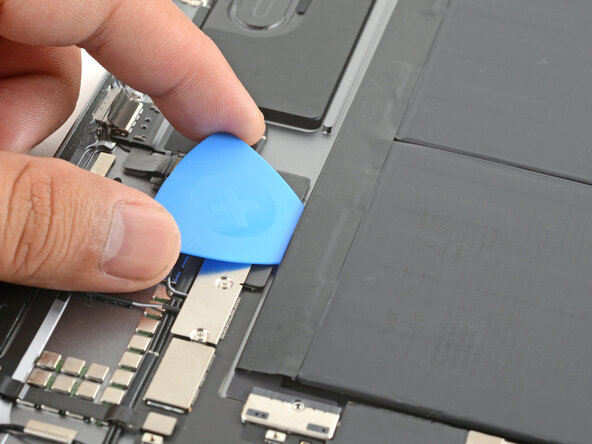
- Slide an opening pick under the battery board to separate the adhesive remnants.
- Grab and pull the battery away from the logic board until the battery connector slides out from under the logic board.
- If the battery connector feels stuck, apply a few drops of isopropyl alcohol under the connector and try again.
- Remove the battery.
- Clean any remaining residue from the frame using a few drops of isopropyl alcohol (>90%) and a lint-free or microfiber cloth.
- If your new battery doesn't come with adhesive, use double-sided adhesive such as Tesa tape to adhere it to the frame.