Acer Aspire E1-571 - Heat Sink Cleaning, Thermal Paste Replacing
ID: 27790
Description: If your system overheating you must to clean...
Steps:
- Switch-off the laptop.
- Remove the battery and the DVD drive.
- Unscrew 2x screws M 2.5x8.0
- With a plastic tool remove the Memory RAM / Hard Drive / Wifi Cover Door
- Remove the SATA HDD, RAM meory module and WiFi mini PCI card
- More detailed information for this step you can found in this manual: Acer Aspire E1-571 - HDD / RAM Memory / WiFi card Replacement
- .
- Please SUBSCRIBE to my channel ツ
- The Keyboard is held by 6x locking clips at up and 2x at both sides.
- Use plastic tool to unlock 6x upper clips.
- Disconnect the keyboard flex cable and you are ready to install the new keyboard.
- More detailed information for this step you can found in this manual: Acer Aspire E1-571 - Keyboard Replacement
- Now is time for screws :)
- 16x M3.0x8.0
- 2x M2.5x5.0
- 3x M2.0x3.0
- Power switch cable connector
- Mouse cable connector
- Use plastic tool to separate the upper case.
- Remove the 2x screws and disconnect 5x flex cable connectors:
- 2x Loudspeakers cable connectors
- LCD Display cable connector
- Microphone cable connector
- USB board flex cable connector
- Don't forget to remove the Card Reader Blanking Plate.
- To take out the Motherboard, pick-up it first from the right side (near to the DVD drive connector).
- Disconnect the Power /Charging cable connector from the back side of the Motherboard.
- 3x screws hold the fan to the Motherboard.
- Another 4x screws and you can open and clean the fan from inside.
- Clean the radiator by using soft brush.
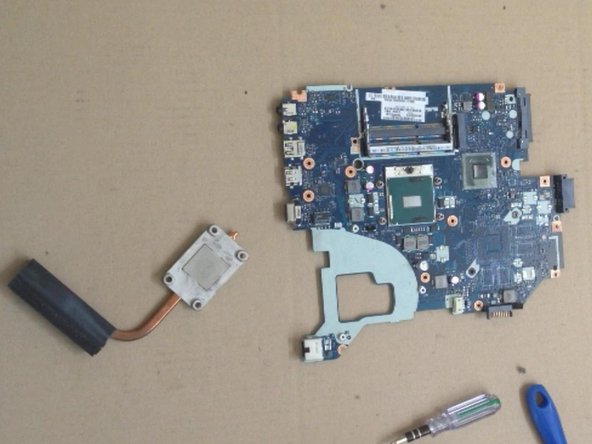
- Remove the heat sink system.
- Careful remove the old thermal patse from the Processor and from the Head-sync system.
- Put a new thermal paste. Cover the entire surface of the CPU crystal.
- Install the Heat-sync system and screw the screws at a few steps.
- Assemble the laptop and after switch-on it check is the fan working.