2011 Dodge Journey Brake Rotor Replacement
ID: 31779
Description: Replacing the brake rotors and pads on your...
Steps:
- Chock (forcefully wedge an object, such as a wood block, between tire and pavement) the wheel on the opposite corner of the wheel you are working on, so that the vehicle cannot roll forward or backward.
- Using the ratchet and the 19mm socket, loosen each of the lugnuts 2-3 turns
- When tightening lugnuts to reassemble, tighten in a star pattern with a torque wrench to 100 ft-lbs.
- Use the hydraulic jack to lift the vehicle, place the jack stand, and lower the car so that it rests on the jack stand.
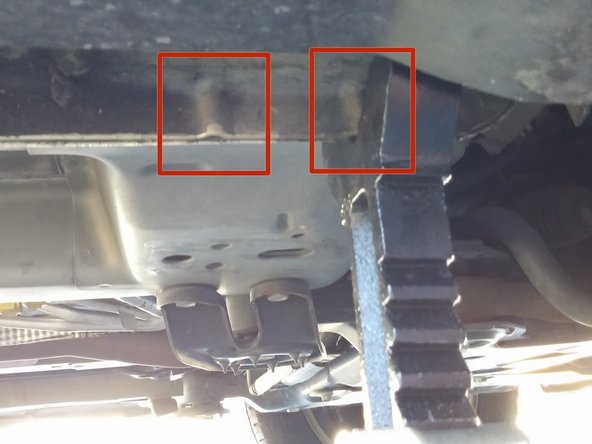
- The bumps in the frame rail are the reinforced areas for lifting the car - lift at one of these umps circled in red, and place the jack stand at the other like in the picture.
- You can now remove the wheel lugnuts the rest of the way and set the wheel to the side
- Use the open end of the 15mm wrench to hold the slide pin, and use the 13mm wrench to loosen both bolts, then completely remove the bolts
- Wiggle the caliper out and off of the pads/rotor, and place out of the way - do not let it dangle by the brake hose.
- Use the brake spreader tool on the front or the caliper wind back tool on the rear to push the piston back into the caliper for assembly.
- Pay close attention that the hose is not twisted when re-installing (flip caliper as necessary to remove twists). A twisted hose will overheat the brakes, causing damage and a reduction or loss of braking performance.
- Remove the brake pads, being careful not to lose clips on caliper bracket.
- The clips will need to be cleaned if reusing, and the tabs on the new brake pads will need to be lubed to allow them to easily slide in the bracket.
- Make sure there is no lubricant on the pad or rotor surface during and after reassembly
- Using the ratchet and socket (21mm for the front, 18mm for the rear), and remove the bolts holding the caliper mounting bracket. Again, it may be helpful to loosen both bolts before complete removal.
- Pull the boot from the caliper bracket and slide the pin out to inspect. If there is heavy pitting or rust, you will want to replace the slide pins and bracket. Otherwise, lube with brake lubricant grease for reassembly.
- A hard rap with the hammer at the location shown should dislodge the rotor from the hub. If not, try alternating hammer strikes back and forth from opposite ends of the rotor hat until the rotor breaks free.
- If you miss the rotor and hit the wheel stud, you can damage the threads, requiring replacement of the stud.
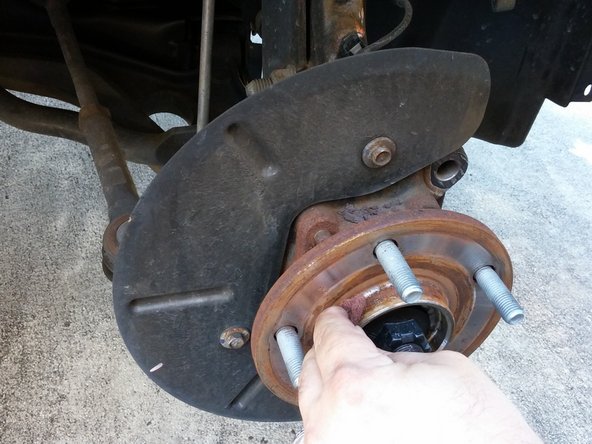
- Use the 3M Scotch Brite pad to clean the rust from the surface of the hub that contacts the rotor (where the wheel studs poke through the hub - see second pic), and to clean any shipping protectant from the new rotor's contact surface (the large flat outer ring surface where the brake pads contact the rotor)