Fujifilm FinePix S5000 Battery Compartment Repair
ID: 34731
Description: The plastic catches on the battery compartment...
Steps:
- Remove batteries, you could even use some tape to keep the battery door out of your way and prevent it from flopping down while you work.
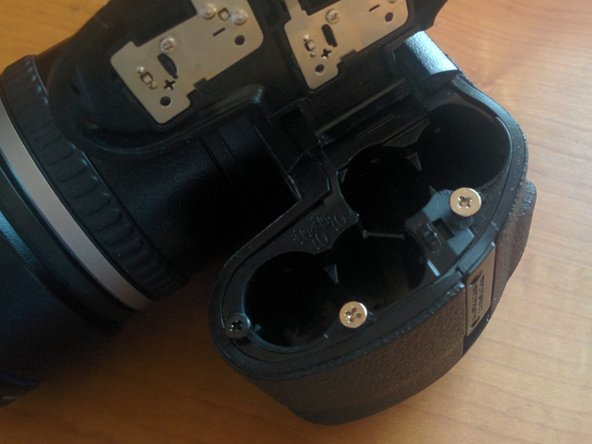
- The three spots circled in red are the latches that seem to fail over time. You'll want to take a knife and cut of the plastic left by the broken pieces so it's flat.
- After smoothing out the left over latches you are ready to drill. Drill three holes at the corners of where the old latches used to be. The picture shows the rough spot where you'll want to drill
- Please double check and adjust your drill hole placement if you think it's needed. This is what I did, and it worked.
- Remember to use a very small drill bit. The plastic walls are thin, and the screws we should be using are very small.
- Be careful not to drill something you shouldn't and do not drill at an angle or drill through the wall of the battery compartment. This is the only real hard part of this repair, take your time and think about what you are doing.
- After drilling the three holes, get out your assortment of tiny screws. We'll want three that are the perfect size, height and girth. Also the flatness and the size of the head of the screw is very important.
- Carefully thread the screws you think would be best into the holes you drilled. Remember you are creating latches using these screws. Do not screw them in all the way, that would defeat the purpose. Screw them in halfway or so, allowing the battery door to latch under the screw head.
- The second picture shows the screws I chose.
- Put in the first screw and make sure it fits, door closes and latches fine without problem before moving on to the second screw.
- Once all screws are in place and the door latches, take a mental note of the placement and depth of the screws.
- Pull out the screws one last time, and put in a drop of loctite or super glue and then put the screws back in making sure to get the proper screw back in the hole it came from and making sure to match the depth it had before.
- Let your camera sit for 24 hours (or however long you can) and then enjoy! This is a very strong and possibly permanant fix for your camera!