Acer Iconia A100 Speakers Replacement
ID: 40961
Description: If the sound from your speakers is distorted or...
Steps:
- Start at any side of the tablet.
- Begin to take apart the tablet with a plastic opening tool along the sides of the tablet.
- Work your way around the tablet.
- There are four side pieces in total.
- Remove the five 4 mm screws from the edges of the tablet with a Phillips #00 screwdriver.
- Carefully separate the back piece from the device using a plastic opening tool.
- Remember to open along the entire perimeter of the tablet.
- Turn the tablet over so that the battery is facing upwards.
- Remove the four 4mm screws located around the battery.
- Use the tip of a plastic spudger or opening tool to gently push the connector head out of its socket.
- Use your fingers or the flat edge of a plastic opening tool to lift the battery up and off of the device.
- Be sure to not have any water around the device while removing the battery.
- Be sure to be cautious while removing the battery and remove carefully; avoid ripping the wires attached to the battery.
- Locate the speakers module, which consists of 2 square black speakers connected by wires.
- Locate the white and blue Home Key FFC ribbon cable between the speakers.
- Use the tip of a spudger or opening tool to lift up and flip the small hinge on the connector. Then gently pull the FFC ribbon cable out its connector socket.
- While a metal spudger tool is shown here and may be used, it is best to use a plastic spudger or opening tool when possible. It is easier to damage cables when using metal tools, so be extra cautious when using a metal spudger like the one shown here!
- Locate the speaker cable. Use your fingers to pinch each side of the black head of the speaker cable, and gently pull it out of its socket.
- The metal spudger shown in the photo is used only to identify the speaker cable, not remove it.
- If you're unable to get a good grip on the black connector head itself, gently pull from the wires near the connector head's base.
- Be sure to pull on the wires near the base and evenly on the full width of the wires so no individual wire is over-strained, which may cause damage!
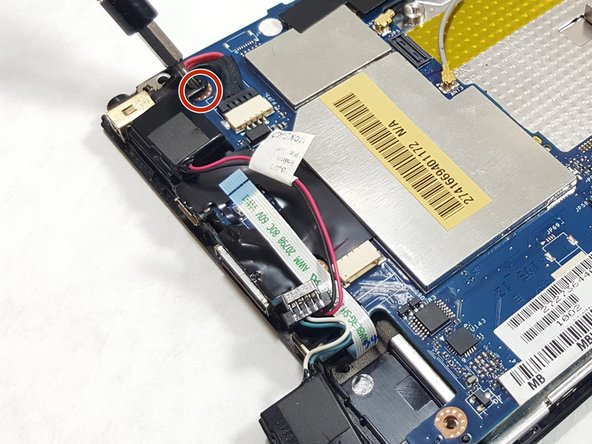
- Unscrew the 4mm Phillips screws securing the speakers module to the device using a Phillips #00 screwdriver.
- There are two 4mm screws in total (one screw securing each speaker).
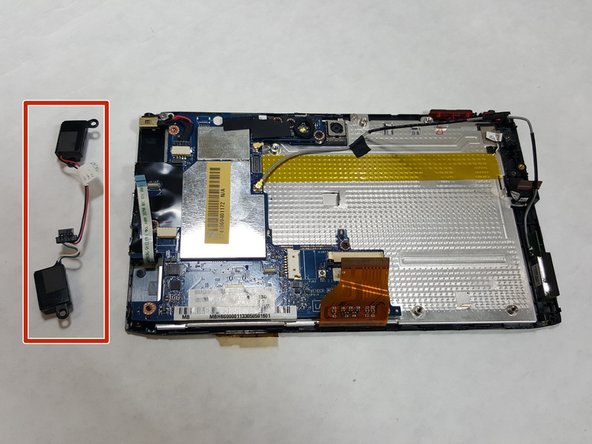
- Now both speakers should be free. Use the edge of a spudger tool to lift each speaker off the device, or use your hands to simultaneously lift each square black speaker off of the device.
- If intact, the two speakers should be connected by wires, forming a one-piece speakers module.