Nokia Lumia 928 Battery Replacement
ID: 61646
Description: This guide will show you how to remove the...
Steps:
- Power down the phone.
- There is a screw located inside the 3.5mm headphone jack that needs to be loosened. Use a Torx T5 screwdriver for this.
- The screw does not come out. Once loosened, It will unlock the lock bar inside the phone. You will break it if you do not complete this step properly.
- Remove the sim card tray on the top of the phone.
- Remove the 4.5 mm Torx T5 screw highlighted with a red circle in the picture. (Note: all screws that you will remove in the phone will be the same)
- There is a sticker located on the screw that needs to be peeled off. This voids your warranty.
- Using the plastic opening tools, you can start to release the plastic clips around the phone. Start in the top left corner, work your way down the left side. Then do the top and bottom of the phone, and finally the right side.
- It can be useful to flip the plastic opening tool upside down in certain areas of the phone to make releasing the plastic clips easier.
- Once all the clips are released, remove the back cover of the phone.
- Remove all 10 T5 screws on the motherboard. All screws are 4.5 mm Torx T5 screws.
- Remove the ribbon connector with a highlighted with a red circle with the plastic opening tool.
- Be very careful with the ribbon connectors as they can easily be ripped off.
- The ribbon connector highlighted in yellow has a zero insertion force connector. This has a black flap on the end that needs to be flipped up before the ribbon cable can be pulled out.
- Remove USB port cover using the plastic opening tool, or your hand. It can be removed easily.
- Pull up the left side of the motherboard.
- There is 1 connector that needs to be removed with the plastic opening tool highlighted with a red rectangle. Do not pull the motherboard away from the display assembly until you have removed it.
- You have now removed the motherboard from the display assembly and the back cover.
- Use the plastic opening tool to pry the battery away from the motherboard.
- This step also requires some patience. It is important NOT to bend the motherboard when trying to pry the battery away from it.
- You should be able to hear the glue separating the two parts. Do not worry too much about this, you will be fine as long as you are careful.
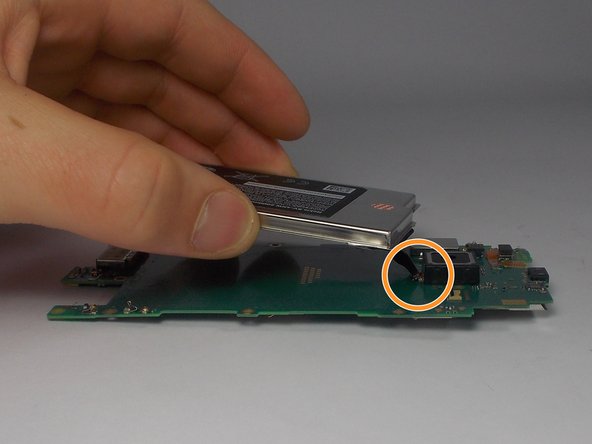
- Now that the battery is separated from the motherboard, it is time to remove it. First you will need to lift the connector for the battery's ribbon cable.
- Once the connector has been freed, you can start to pull the battery away from the motherboard.
- Be careful of the ribbon cable connecting the battery to the motherboard. It is a bit tricky to pull through the hole, but patience is necessary.
- Once you feed the ribbon cable out through the hole in the motherboard, the battery can be removed from the motherboard.