Hp Pavilion dv6-2155dx Keyboard Replacement
ID: 72803
Description: In this guide you will learn how to remove the...
Steps:
- Shutdown your computer and remove the battery before beginning the replacement.
- Loosen the screws using Phillips #01 screwdriver with the extension attached.
- The screws will not come out completely but stay on the panel.
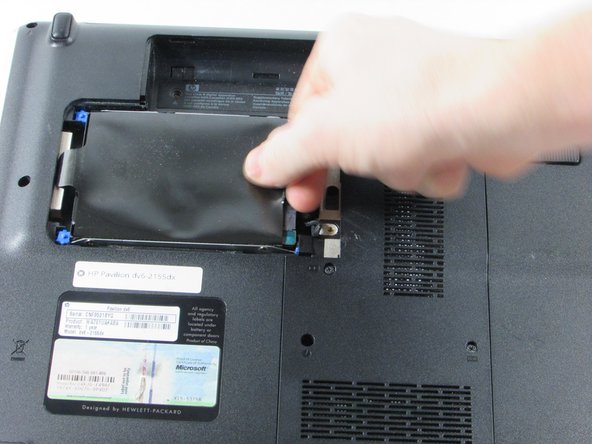
- After removing the two screws securing the Hard Drive to the bottom case, remove the panel to reveal the hard drive.
- Locate the tab of the black Mylar film on the right hand side of the hard drive.
- Gently grip it with your thumb and index finger.
- Pull the Hard Drive to the right to loosen the it from the frame.
- The left side of the hard drive will pop up and should slide out freely until you see the black connector on it's right side, connecting it to the computer.
- When removing the Hard Drive from the frame, you will see a black connector on it's right side.
- Turn the Hard Drive over and grasp the Hard Drive with one hand as you grip the connector with the other hand to remove the connector from the hard drive.
- To safely remove the Hard Driver, do not wiggle or jerk the connector off of the Hard Drive, pull straight off.
- Remove the six screws. Four are marked with a keyboard icons, two are located on the top corner.
- Remove the three screws located in the battery port.
- Red marked screws: 7mm long and the head is 4mm wide. Orange marked screws: 4mm long and head is 4mm wide.
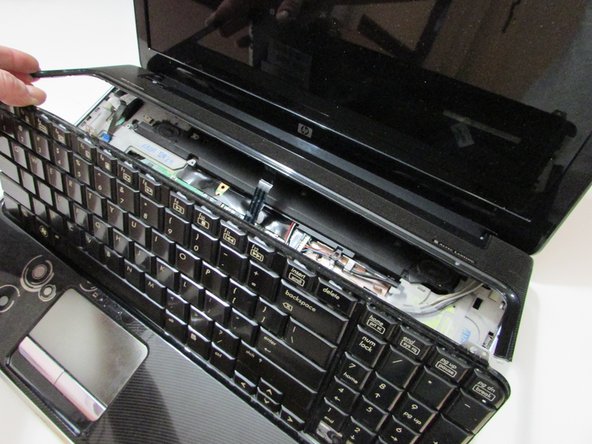
- Use a plastic spudger to gently un-clip the top panel above keyboard.
- Tab openings are located by the F1 key, F5 key, and page up key
- Once loose, do not try and remove it completely
- Once the top panel is propped open, remove the three 4mm silver screws located at the top of the keyboard with a Philips head screw driver, size #1.
- Flip keyboard forward and raise the keyboard off the frame.
- Be careful not to prop the top panel up too high as to disconnect the two ribbons connecting it to the inside of the laptop.
- Once you have removed the three screws, gently lift the keyboard away from the laptop.
- Be careful when lifting the keyboard as to not break or damage the ribbon cable that connects the keyboard to the laptop.
- Use plastic spudger to flip up the black strip on the ZIF connector that connects the ribbon cable to the motherboard.
- Be sure to flip the hinge retaining flap, not pulling the connector itself.
- Remove the film from system board to then safely remove the keyboard.