Nintendo 64 Teardown
ID: 74923
Description: In honor of the 20th anniversary of its...
Steps:
- The Nintendo 64 was Nintendo's third home console. Released in 1996 for the US and Japan, the N64 boasted 64-bit graphics for the most realistic gaming experience ever made to date. The N64 was co-developed by Nintendo and Silicon Graphics.
- NEC VR4300 64-bit CPU, running at 93.75 Mhz
- Silicon Graphics Reality Coprocessor (RCP) GPU
- 576i (720×576) Composite output
- Support for up to 4 players
- Let's take a look at the I/O, shall we?
- 4 N64 controller ports
- Nintendo 64 Game Pak slot
- Composite video cable port
- N64 power supply port (12V/3.3V DC switching)
- Let's begin by removing the top cover.
- Remove the 6 Gamebit 4.5mm screws found at the 4 corners and near the top-middle and bottom-middle.
- Using a metal spudger, take out the Jumper Pak from its slot and set it aside.
- Flip the console upright, and the top cover just comes right off.
- Remove the 10 crossbar screws using a Philips #2 screwdriver.
- Take out the 2 screws holding in one piece of the expansion slot shield, also with a Philips #2
- The 2 black screws and the one at the bottom left of the expansion slot shield are easily removed with a Philips #2.
- Finally, remove the 2 long screws from the 2 ends of the slot with a Philips #0.
- Remove the 3 pieces of the expansion slot shield.
- Make sure to remove these pieces BEFORE removing the heatsink crossbar.
- The heatsink crossbar comes right off, which gives us access to the motherboard shield.
- The 5 screws on the two sides of the shield are swiftly removed with a Philips #2
- The 2 screws on each side of the Game Pak slot are quite long, and are removed with a Philips #2.
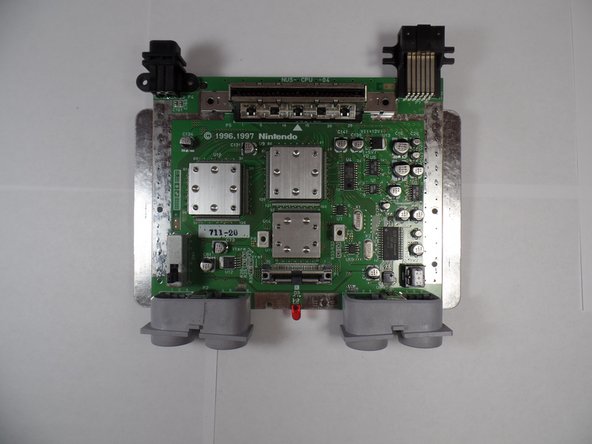
- With that, the shield slips right off, letting us gaze at the Nintendo 64's source of power.
- On the motherboard are 3 very pronounced steel blocks, which indicates that the important stuff is under there. But before removing these, it's best to take the motherboard out of the bottom case.
- In order to remove the motherboard, unscrew the 4 Philips #2 screws from the two back I/O ports, allowing extraction of the motherboard.
- Using a Jimmy, pry off each chip's heatsink, revealing the console's processing units.
- Nintendo CPU-NUS-A
- Nintendo RCP-NUS
- Nintendo RDRAM18-NUS-B (2x2MB modules)
- And thus concludes a successful teardown of one of the greatest consoles of all time.