Canon PowerShot SX530 HS Shutter Back Cover Replacement
ID: 78755
Description: This guide shows how to replace the Shutter...
Steps:
- Flip the camera upside down to find the battery compartment (marked CARD/ BATT. OPEN).
- Press into the grooves of the battery door and slide the panel in the direction of the arrow.
- Gently press down on the orange release button found inside.
- After pressing the release button, pull the battery out of the camera.
- Flip over the camera.
- Use a Phillips PH000 to remove the two 4mm screws near the center of the camera.
- Use a Phillips PH000 to remove the two 6mm screws on the ends of the camera.
- Locate the left side of the camera.
- Use a Philips PH000 to remove the two 6mm screws.
- Rotate the camera to the side with the removable cover containing the HDMI and mini USB ports.
- Use the Phillips PH000 to remove the 7mm screw located next to the HDMI port. This screw has red loctite.
- Use the Phillips PH000 to remove the 4mm screw near the USB port.
- Use the Phillips PH000 to remove the 7.4mm screw near the USB port.
- Rotate the camera to locate the side with the LCD screen.
- Use a Phillips PH000 to remove the two 6mm screws above the LCD screen.
- Once the screws are out the back panel, it is ready to be taken off. Grip the backside of the camera and pull it away evenly on every side. The backside must come off straight from the front.
- Locate the Internal Button Sensor Plate. This is the white and silver plate to the right of the LCD Display.
- Use a Phillips PH000 to remove the two 3mm screws on the panel.
- Use a Phillips PH000 to remove the 3mm screw connected to the motherboard.
- Peel off the plate. Be careful, as the plate is connected to the motherboard underneath by a ribbon.
- Use a plastic opening tool to unlock the ribbon tape.
- Remove the ribbon tape from the motherboard.
- Locate the Display screen in the center of the camera.
- Use a plastic opening tool to pry off the LCD screen. Start on the bottom left corner—this is the furthest away from the ribbon holding it down on the right side.
- The adhesive holding down the display should be strong enough to put the display back on.
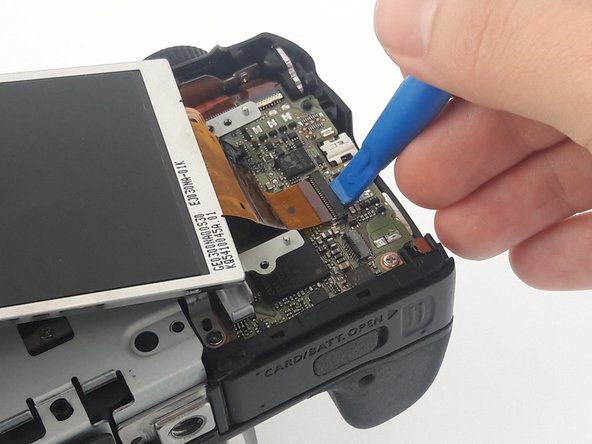
- Use a plastic opening tool to unlock the ribbon tape.
- Remove the ribbon tape from the motherboard.
- Remove the two screws (5-6mm) on the left and right side of the shutter panel with a Phillips PH000 screwdriver.
- Lift the shutter light and pull the shutter back panel off the camera.
- Be careful when pulling out the panel because it is connected to the motherboard.