ThinkPad T420 Hard Drive Replacement
ID: 78827
Description: If the hard drive in your ThinkPad T420 has...
Steps:
- Due to the EET missing several components present in the Pro Tech Go and only being $20 cheaper, the EET has been removed. The EET will work for this guide as-is, but if you are shopping for a new toolkit to complete this guide, the Pro Tech Go (new or refurbished, refurbished is ~$32 cheaper), or Pro Tech ($79 new/~$59.95 refurb) is the current recommended toolkit for this guide.
- If you are interested in a refurbished kit stock levels change frequently but can be found here.
- If completing a step like a clone of your old hard drive/SSD, DO NOT remove the battery until the process is complete!
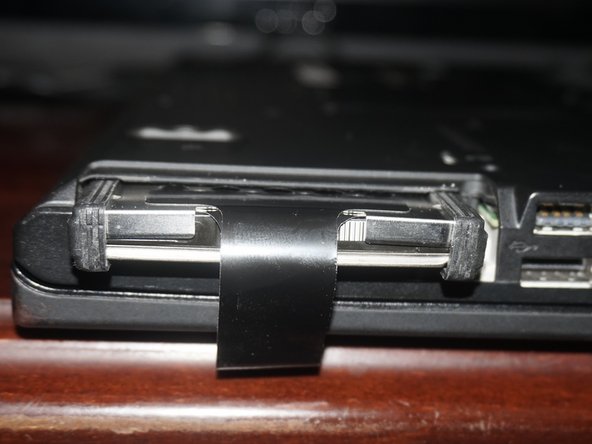
- Unlock the latch locking the battery in the laptop.
- NOTE: To remove the battery, the tab must be held in to avoid having the lock reinitiate inside the laptop.
- After unlocking the battery, remove the battery from the reverse way it is installed to remove it from the laptop.
- If your build of the OS was installed years ago, you can clone the drive as shown here or reinstall from scratch. However, a reinstallation from scratch will likely be the better choice for older installations with excessive file buildup.
- Before replacing the drive, backup your personal files. This can be done by hand, or automated.
- EET owners: Your kit has this bit. No purchase needed.
- Remove the hard drive door from the system. Use a Phillips #1 bit.
- Once the screw is loose, remove the drive cover as shown.
- Pull the black tab on the drive caddy to remove the drive.
- EET owners: Your kit has this bit. No purchase needed.
- Remove the hard drive bumpers.
- Remove the drive screws using a Phillips #1 screwdriver.
- Remove the old hard drive from the laptop. If you intend to keep it, store it in a antistatic bag if possible.
- Install your new drive using steps 6 through 3. Reinstall or reimage the operating system.
- If you are installing Windows, use an official ISO or purchase OEM installation media without a product key.
- In order to save time setting up your system in the future, reinstall Windows from scratch and image the computer once all the drivers and updates are installed.
- After reassembling the system and confirming the new drive is recognized, reinstall your operating system.