JBL Flip 3 USB Port Replacement
ID: 87647
Description:
Steps:
- Remove the speaker grill using hands or a standard spudger.
- Re-assembly Notes
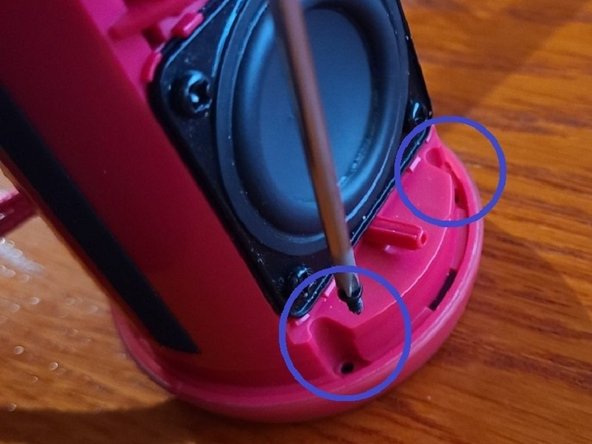
- Note the three alignment pins on the inner part of the housing and take care to line these up and insert the pins into the receivers on the chassis fully
- With the pins fully engaged in the middle, pull the long edges away from the chassis slightly and then squeeze to engage the plastic clips into the chassis (two per edge, at the top and bottom.
- Remove the ten screws of the outer frame.
- Six (6) screws along the thin long edge that are screwed in the chassis
- Four (4) screws ( 2 per end) holding the ends to the chassis.
- Reassembly Notes
- Do not over-tighten screws.
- Pull on one end gently and remove the outer frame.
- Remove the silicone button cover
- Re-assembly Notes
- Insert the silicone button cover first.
- Line-up the bottom end first and carefully guide the USB port cover through the matching hole as you insert the top end.
- Remove the twelve screws that hold the two speaker end caps (6 per end)
- Re-assembly notes
- Align the two holes that are closest together (and pin underneath) to match the chassis holes first to align the entire end cap.
- Tighten the six (6) screws per end cap (12 total). Do not over-tighten.
- Carefully lift the retaining tab and pull ribbon cable out of the connector.
- Note: Black plastic tab can fall out easily, so note orientation in the picture before re-inserting tab if it fell out.
- For re-assembly, guide ribbon cable through the hole before re-inserting and closing the tab.
- Remove the six (6) screws retaining the control panel to access the USB Port (battery is also visible).
- For re-assembly: do not overtighten screws.
- From the end cap side, remove the silicone holding the wires in place.
- Proceed carefully Make sure the speaker is powered off. Avoid cutting the wires. A plastic ustensil is probably best, or a very small, dull screwdriver.
- This took me about 30 minutes and I forgot to take pictures.
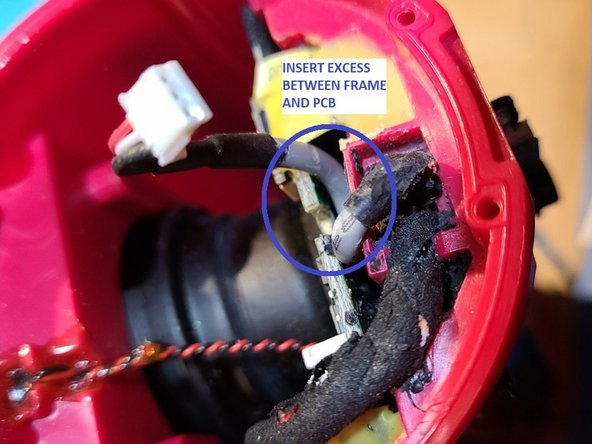
- Disconnect the AUX input plug and then pull that wire out from under the PCB so it can be aligned with the hole.
- Re-assembly Notes.
- Push the AUX wiring between the PCB and the chassis.
- Plug the AUX connector back in.
- Pull up on the USB Port PCB to break the lower glue/seal
- Pull PCB out and rotate upward to align wiring
- Gently guide wires at the end cap through the hole to extend the USB Port PCB as far out as possible.
- Re-assembly Notes Pull the wiring from the end cap while aligning and inserting the PCB back in.
- WARNING! The two white connectors are not plugs. Do not attempt to pull them out.
- IMPORTANT Take note or a picture of the wiring color and orientation for re-assembly later.
- Unsolder the two connectors from the PCB.
- Unsolder the old USB Port.
- WARNING! There are two different JBL Flip 3 speaker USB Ports. Order a replacement port of the same type that you have in your speaker.
- Solder the new USB Port (5 pins and 4 mounting tabs)
- Perform a continuity check to make sure none of the pins are bridged.
- Align the connector holes in the correct orientation for each plug, and solder to the USB Port PCB.
- Gently return the USB Port PCB to it's location while gently pulling on the wires at the end.
- Reconnect temporarily the AUX connector
- Reconnect temporarily the Ribbon Cable to the control panel
- Power on the speaker, and then insert a USB charger to ensure that the battery charges properly.
- Test the AUX input to ensure it is still working.
- Following a successful test, disconnect the control panel ribbon cable and the AUX plug.
- Re-assemble the speaker in reverse order, taking note of the re-assembly notes provided at each step.