DJI Phantom 4 Shell Replacement
ID: 95516
Description: You are probably here because you wanted to get...
Steps:
- Push down and twist the propellers counter-clockwise to release from the drone.
- Firmly press the battery tabs on top and bottom of the battery and slide out the battery.
- If gimbal lock is still on, remove it from the drone.
- Using a T8 screwdriver, remove the eight Torx screws from the plastic shell.
- Using a T6 screwdriver, remove all eight screws on the grey gimbal assembly.
- Using a plastic spudger or pick, gently pry the gimbal assembly from the drone.
- Do not try to pull the gimbal assembly away from drone just yet—there are cables that must be unplugged first.
- Using a Phillips #000 screwdriver, remove the two screws and the gimbal bracket.
- Using your fingers or needle-nose pliers, gently unplug the left (red box) cable by pushing in the white clips on the sides and sliding the cable out.
- Using a spudger, unplug the 3-in-1 cable on the right (orange box) by gently prying up.
- Using a Phillips #000 screwdriver, remove the two screws and the antenna bracket.
- Using a spudger, gently disconnect the four antenna cables.
- Remember the order in which the antenna cables are plugged in, or refer to this step during reassembly.
- Using a Phillips #000 screwdriver, remove the two screws located on the white plastic tabs.
- Using a spudger, carefully bend the two metal clips upwards.
- Be gentle and do not break the clips. You will need to bend them back down upon reassembly.
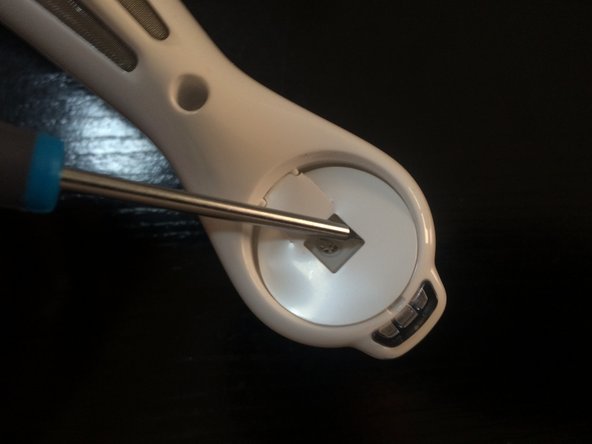
- Using a spudger or flathead screwdriver, gently pry up the LED cover.
- Using a spudger or flathead screwdriver, carefully pry up the underlying sticker.
- PRO TIP: Stick the sticker to the smooth side of the plastic LED cover to keep it clean and from losing stick. PRO TIP on reassembly: be sure to align the stickers so the tab fits in the snap slot.
- Repeat this step on all four LED covers.
- Using a T8 screwdriver, remove the 3 screws that attach the shell and motors together.
- Repeat this step on all 4 motors.
- Using a spudger or pick, carefully pry your way around the seam, undoing the clips that attach the shell together.
- PRO TIP: If you are replacing the shell because your old shell is trashed, don't worry about cracking or damaging the broken shell. Just go for it.
- Do not try to pull the shell completely apart just yet, there are some cables that must be unplugged first.
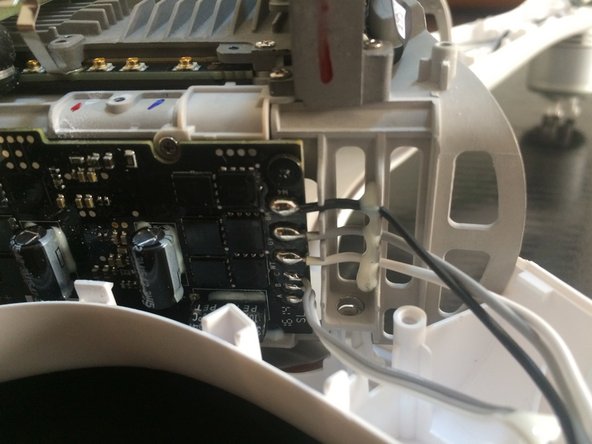
- Using your fingers or needle-nose pliers, gently unplug the cables by pushing in the white clips on the sides and sliding the cables out.
- Using a knife or flathead screwdriver, remove the melted plastic rivets holding down the LED board. Be careful to not damage the LED.
- Carefully pry up the LED board from the drone shell.
- Repeat on all four wings.
- During reassembly use a dull soldering iron tip to remount the LED board to the new shell.
- Using a small screwdriver, carefully pry up the motor and LED cables where they are glued down to the shell.
- Repeat on all four wings.
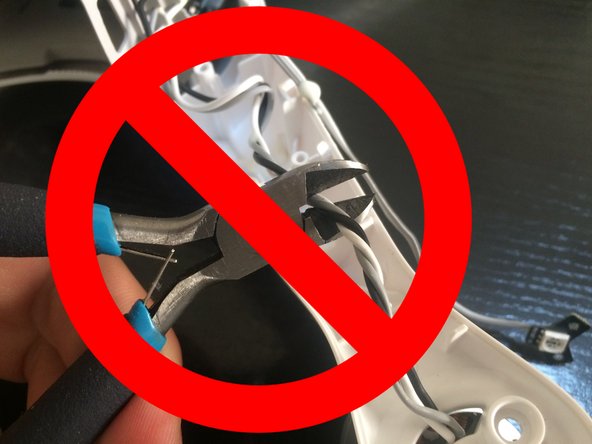
- Desolder all 12 of the motor wires that connect to the drones mother boards.
- DO NOT cut the cables with wire cutters—they are enameled wire and are a pain in the butt to solder back together and have them still work. Do yourself a favor and just desolder them from the board.
- For reassembly, note the order of the cables. While the drone is upside down, black is the top wire, grey is middle, and white is bottom.
- Using a T8 screw driver, remove the four screws that mount the battery bay and brains from the upper shell.
- Carefully remove the brains out of the upper shell.
- Carefully peel the shielding sticker from the upper shell. Note that you can't remove it all the way until you remove three screws.
- Using a Phillips #000 driver, remove the three screws that are mounting the board to the upper drone shell.
- Carefully pry off the screw covers on the legs that are attached to the lower shell.
- Using a T6 screwdriver, remove the two screws. Repeat on all four corners.
- Take note on where you are removing the cables from, and install them in the new lower shell in the same way you found them.