Acer Aspire One Cloudbook 11 AO1-131-C7DW Speaker Replacement
ID: 99202
Description: Does the sound out of your speakers sound...
Steps:
- Power the laptop off.
- Flip the laptop over and position it so the opening faces you.
- Remove the rubber foot located near the opening side of the device using tweezers.
- Unscrew the five 5-mm screws using the PH0 screwdriver.
- Identify the HDMI port located in the side of the laptop opposite to the power button.
- Insert the plastic opening tool into the divet of the back panel located above the HDMI port.
- Pry along the laptop frame until the back panel comes loose.
- Do not pull the back panel too hard as the battery is still connected to the back panel and the motherboard. This can damage your device.
- Rotate the device so the opening faces you again.
- Hold the back panel away from the laptop and remove the 4-mm screw using the PH0 screwdriver.
- This screw is fastening the battery to the laptop.
- Lift the back panel gently.
- Unplug the cable that connects the battery to the motherboard.
- Detach the back panel, which still includes the battery.
- Position the computer so the opening of the laptop faces you.
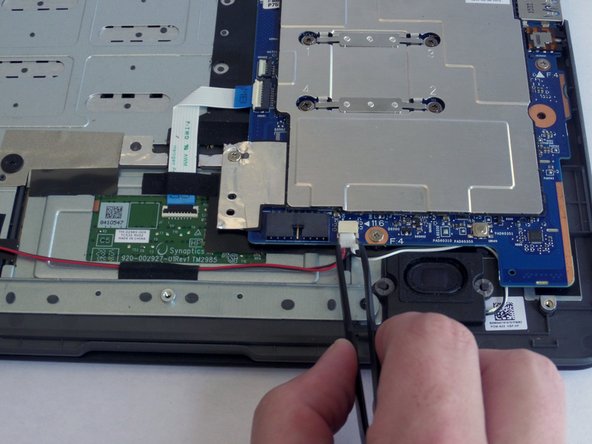
- Unplug the white plastic connector that has red, white, and black wires using tweezers.
- Unhook the speaker by sliding it to one side first and then by lifting it up.
- The gray rubber ring may come off during this process. Insert it back onto the speaker if this happens.
- Repeat this step for the other speaker.
- Remove the tape strips holding the wires to the metallic plate using tweezers.
- Save the tape strips for the replacement of the new speakers.
- Remove the speakers.