Asus VivoBook E203MA-TBCL432B Battery Replacement
ID: 122135
Description: If you find that you need to replace the...
Steps:
- Position the laptop so that the bottom panel is facing upwards, the hinge is away from you, and the ASUS logo is against the table.
- It will be easier to replace the battery if the laptop is closed.
- Use a Phillips #0 screwdriver to remove the eight 5 mm screws on the back panel.
- Remove the two 7 mm Phillips #0 screws.
- The 8 screws marked in red are all of the same length, 5 mm, and should not be interchanged with the two longer 7 mm screws marked in orange.
- Insert the iFixit opening tool in between the back panel and the rest of the laptop.
- With the iFixit opening tool, lift the panel from the laptop body. Work your way around the device creating separation with the tool.
- Once there is enough separation between the back panel and the device, gently pull off the back panel with your hands and completely remove it.
- Make sure to use a plastic tool, not a metal one, so that you don't scratch the panel.
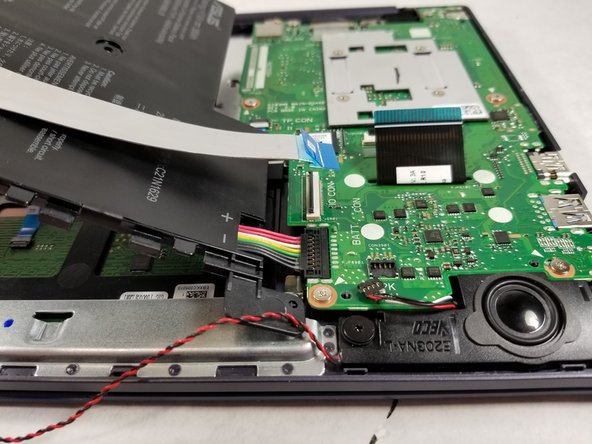
- Now that the back panel is removed you can clearly see the battery and all of its connectors.
- Begin by removing the silver ribbon cable along the back of the battery.
- To disconnect it from the motherboard, lift the black tab on the Zero Insertion Force (ZIF) connector up and pull the cable away using the blue tab.
- Disconnect the ribbon cable from the left side in the same way.
- Remove the red and black wire along the bottom of the battery.
- This does not need to be disconnected, only removed from the clamps along the bottom of the battery.
- Using the Phillips #0 screwdriver, remove the two 3 mm screws located at the top and left side of the battery.
- Gently lift the battery being mindful of the one cable still connected to the motherboard.
- With the battery lifted, pull the remaining connector going to the motherboard up, it should come out with little force.