Samsung Galaxy Buds Battery Replacement
ID: 127556
Description: Follow these steps to replace the battery in...
Steps:
- If possible, drain the battery in your Galaxy Buds before performing a battery replacement.
- Begin by taking off the earbud's rubber wingtip:
- Grab the tip (where the "R" label is) and gently pull upward on it while slipping it off the bud.
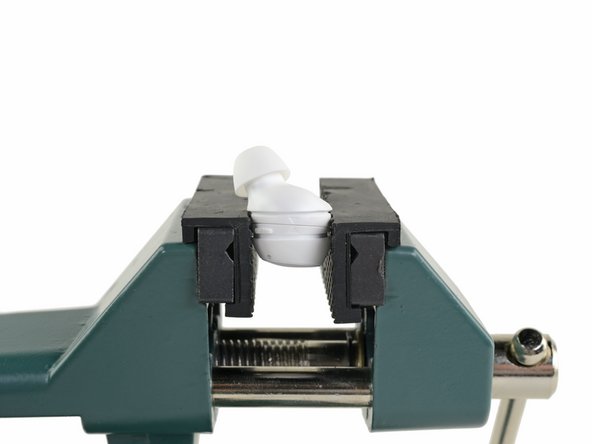
- Place the bud horizontally into a rubber-guarded vice or a pair of blunt pliers.
- Apply steady, even pressure to either side of the bud along the main housing seam (the seam between the two arrows). The pressure should break the seal.
- Only apply enough pressure to create a small gap between the two halves of the bud. If you use pliers, put a cloth between the pliers and the buds to prevent the teeth from digging into the soft plastic.
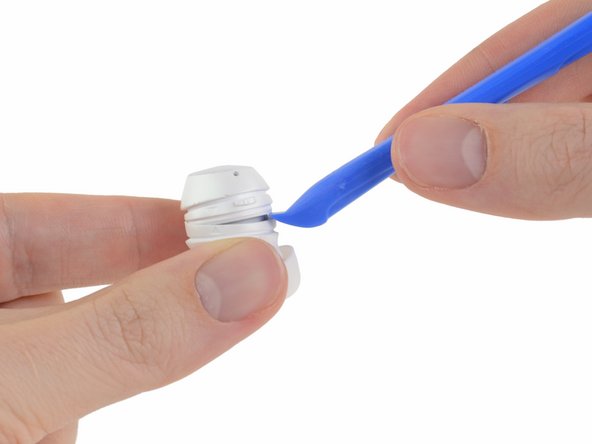
- Once you have created a gap between the two halves of the bud, gently pry them apart with a plastic opening tool.
- You may need to work your way around the entire earbud with the opening tool. Take your time and do your best not to deform the plastic.
- Carefully remove the top half of the bud.
- Be careful when pulling the halves apart! Sometimes the battery assembly gets caught in the case. If the top half of your case doesn't come out cleanly, skip this step and disconnect the cable in step 4 before separating the two halves of the bud.
- During reassembly, line up the arrows on the two halves of the outer case, then press the halves together until they snap into place.
- Use a spudger to lift up and disconnect the press connector connecting the battery/board assembly to the speaker drivers and the other sensors in the case.
- Once the cable is disconnected, remove the assembly from the bud.
- During reassembly, slide battery/board assembly into the earbud so that the peg from the outer case fits into the notch in the battery housing. Then reattach the connector to reconnect the assembly.
- The remaining components are held together with clips and light adhesive. Work carefully, stay organized, and don't tug on anything too hard.
- Pry up and remove the plastic cap from the bottom of the battery/board assembly.
- The motherboard consists of two boards wrapped around the battery housing, connected by a flex cable.
- Use an opening tool to gently pry up one of the boards along its edge, away from the flex cable.
- Carefully unwrap and remove the motherboard from the battery housing.
- During reassembly, make sure the pegs on the battery assembly align with the notches in the motherboard to ensure a proper fit.
- Use a plastic opening tool to pry up and remove the crescent-shaped cap on the top side of the battery housing.
- The bottom of the battery housing has holes, which allow you to push the battery out. The flat side of a spudger fits perfectly through the widest opening, marked here in red.
- Insert the flat end of a spudger (or another plastic prying tool) into the bottom of the battery housing and push the battery out the other side.
- Remove the battery from the battery housing.
- If possible, transfer the foam strips from the original Galaxy Buds battery to your new one. The foam helps to prevent contact between the battery and other bits inside the bud, and also keeps the battery from moving around inside the housing.