Xiaomi Redmi Note 8T Battery Replacement
ID: 135670
Description: Use this guide to replace a worn-out or dead...
Steps:
- Before you begin, switch off your phone.
- Apply a heated iOpener to the back of the phone to loosen the adhesive beneath the back cover. Apply the iOpener for at least two minutes.
- Secure a suction handle to the bottom of the rear glass, as close to the edge as possible.
- If the phone's rear glass is cracked, the suction handle may not stick. Try lifting it with strong tape, or superglue the suction handle in place and allow it to cure so you can proceed.
- Lift the rear glass with the suction handle to create a small gap between the glass and the frame.
- Insert an opening pick into the gap.
- If you have trouble, apply more heat to further soften the adhesive. Follow the iOpener instructions to avoid overheating.
- Slide the opening pick to the bottom right corner.
- Insert a second opening pick and slide it to the bottom left corner to cut the adhesive.
- Leave the opening picks in place to prevent the adhesive from resealing.
- Don't remove the suction handle yet. You're going to use it later in the removal procedure as a rear glass stand.
- Insert a third opening pick at the bottom left corner.
- Slide the tip of the opening pick from the bottom left corner along the side of the phone to cut the adhesive.
- Leave the opening pick in its place at the top left corner to prevent the adhesive from resealing.
- If the adhesive becomes hard to cut, it has most likely cooled down. Use your iOpener to reheat it.
- Insert a fourth opening pick under the top left corner of the rear glass.
- Slide the opening pick along the top edge of the phone to cut the adhesive.
- Leave the opening pick in the top right corner to prevent the adhesive from resealing.
- Do not insert the opening pick deeper than 5 mm to avoid damaging the fingerprint connector.
- Insert a fifth opening pick at the top right corner of the phone.
- Slide the opening pick along the right side to cut the remaining adhesive.
- Do not remove the rear glass all the way yet, the fingerprint cable is still connected to the motherboard.
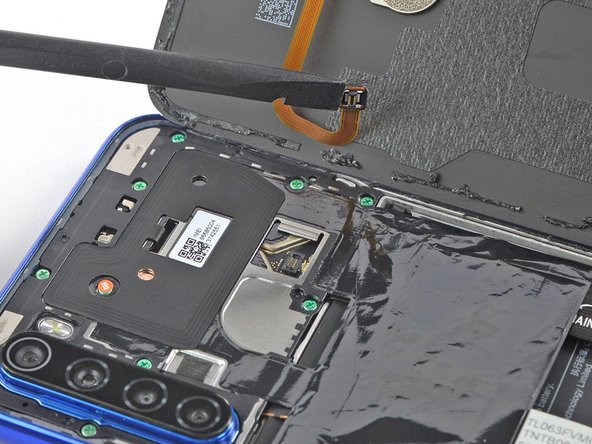
- Carefully fold the rear glass to the right side of the phone. Use the suction handle as a stand for the rear glass.
- Use a spudger to pry up and disconnect the fingerprint flex cable.
- Remove the rear glass.
- During reassembly, this is a good point to power on your phone and test all functions before sealing it up. Be sure to power your phone back down completely before you continue working.
- Remove the eleven Phillips #00 screws (3.9 mm length).
- Insert the tip of an opening pick underneath the bottom edge of the motherboard cover.
- Use the opening pick to pry up the motherboard cover.
- Remove the motherboard cover including the black protective foil that covers the battery.
- Use a spudger to pry up and disconnect the battery flex cable.
- Use a spudger to pry up and disconnect the main flex cable.
- Use a spudger to pry up and disconnect the display flex cable.
- Use a pair of tweezers to carefully peel the black ends of the two adhesive strips off the bottom edge of the battery.
- Use a pair of tweezers to pull out the adhesive tabs from underneath the battery.
- The adhesive tabs underneath the battery can rip very easily. Make sure you pull out the tabs in a slow and steady motion and in a flat angle. To prevent the adhesive tabs from ripping, it's helpfull to twist the strip around the tweezers.
- If you manage to pull out both of the adhesive strips without ripping you can jump to Step 21 in order to remove the battery. If one of your adhesive strips rips during the removal, continue with the following step.
- Apply a heated iOpener to the screen to loosen the adhesive beneath the battery. Apply the iOpener for at least two minutes.
- Try your best not to deform the battery during the following removal process. Soft-shell lithium-ion batteries can leak dangerous chemicals, catch fire, or even explode if damaged. Do not use excessive force or pry at the battery with metal tools.
- Insert a spudger into the gap between the daughterboard cover and the battery at the bottom left corner of the battery.
- Use the spudger to pry up the battery until you created a small gap underneath.
- Slide a plastic or playing card into the gap you created with the spudger.
- Slide the plastic card underneath the battery and cut the adhesive with it. Work your way along the left edge of the battery until you've loosened all adhesive.
- Remove the battery.
- Do not reinstall a damaged or deformed battery, as doing so is a potential safety hazard.
- Before adhering the battery, temporarily reconnect it to help align it correctly. Adhere the battery to the phone and then disconnect it and continue reassembling your phone.