HP Envy x360 m6-w103dx Display Replacement
ID: 145075
Description: This replacement guide is for the display of...
Steps:
- Before you begin, be sure to power off your laptop.
- Using an opening pick, remove the 4 rubber feet and 4 screw covers.
- Unscrew the twelve 6 mm screws from the bottom of the laptop using a Phillips #0 screwdriver.
- Open the laptop carefully, with the keyboard face up.
- Pry around the outside of the keyboard with the plastic opening tool until the keyboard can be lifted slightly.
- When lifting the keyboard do not pull too hard. There are cables that must be disconnected before the keyboard can be removed.
- Lift the keyboard until you can see the cables connected to the motherboard.
- Gently lift the tab on each ZIF connector that connects each cable to the motherboard using a spudger. Once each tab is flipped up, the corresponding ribbon cable will come out easily.
- Detach the keyboard.
- Remove the four 6 mm Phillips #0 screws holding the battery in place.
- The white arrows on the battery point to where each screw is.
- Unplug the ribbon cable by flipping up the white tabs on the ZIF connectors and gently sliding the ribbon cables out of their sockets.
- Unplug the battery connector by grasping the small white tabs on either side of the connector and pulling down towards the battery.
- Lift out the battery.
- You may need to peel off the ribbon cable and replace it after installing the new battery if your replacement part doesn't have one already adhered.
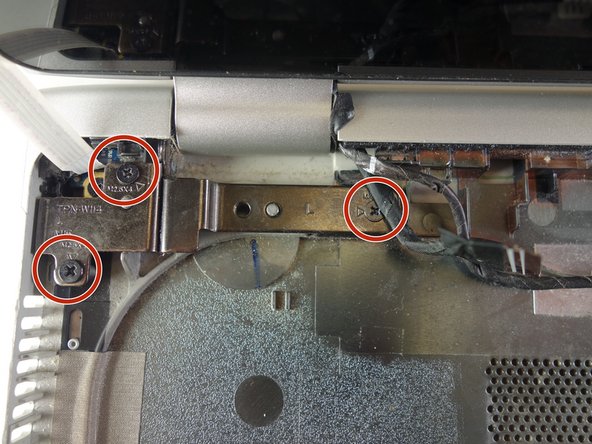
- Remove the six 6 mm screws from the hinges with a Phillips #0 screwdriver.
- Carefully remove the display from the laptop.
- Remove the screen from the rest of the display using a spudger.
- Remove the tape on the bottom right of the display with tweezers.
- Remove the tape and disconnect the ribbon from the top right of the display using blunt tweezers.
- Remove the display bezel using a spudger.
- Carefully pry up the display from the bezel.