HP/Canon - Printhead cleaning -- ink tank/printhead permanently installed (modular)
ID: 173856
Description: This guide will teach you how to clean a dirty...
Steps:
- In addition to the parts listing, these items are highly recommended:
- Ink protection: Plastic bag or ink caps
- Only needed in specific cases: Replacement ink for preparation process after cleaning (3rd party ink works, but will nag you).
- This is only needed if your current ink set is risky to use in the event of a lost calibration (i.e. refilled with a used chip); RECOMMENDED if you use non-XL carts.
- Optional (Stubborn clogging): Gloves and 91% alcohol
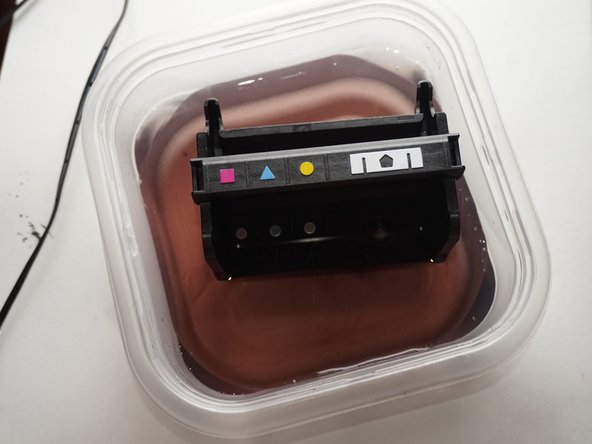
- If possible, use hot distilled water.
- If the water is dirty, get a fresh bowl - especially with sources like a coffee maker.
- Before removing the printhead, hot water is needed. Remove the K-Cup holder and get a bowl of water.
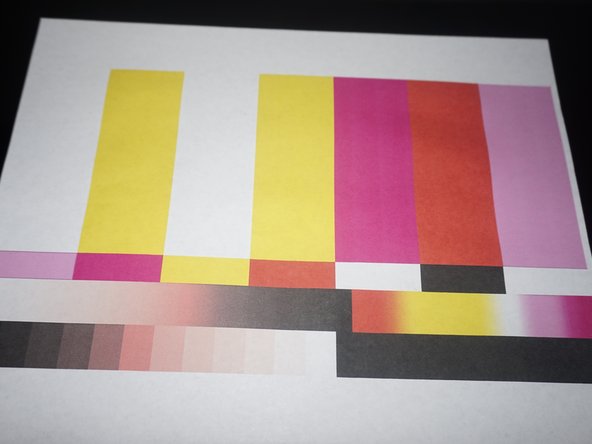
- Print a test image as a baseline. A good image can be found here: SMPTE color bars.
- Remove the ink cartridges from the printer. Install the shipping caps or put them in a plastic bag.
- ANY PRINTER SPECIFIC REMOVAL STEPS ONLY APPLY TO HP PRINTERS USING A REMOVABLE 564/920 PRINTHEAD (and similar designs, like the OJ Pro 8000 series printhead). Every manufacturer uses their own mounting design.
- (HP ONLY) If the printer is plugged in while the printhead is removed, the calibration data may be erased. Verify the printer is unplugged FIRST!
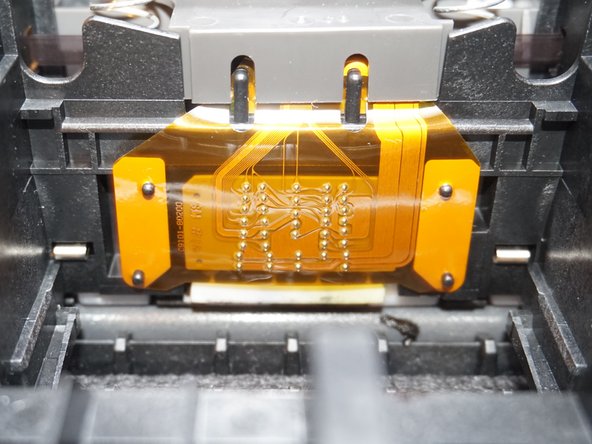
- When the printer is unplugged, lift the lever up and remove the printhead.
- Remove the printhead as shown. IMPORTANT: Leave the scanner lid open, or put a note near the printer.
- THESE STEPS MAY NOT BE REQUIRED ON ALL PRINTERS. If your printhead contact is similar, it is recommended to clean it regardless of the printer manufacturer.
- (HP ONLY) Failure to clean this area may result in a Ink System Failure warning, and a lost calibration.
- Using an alcohol wipe, clean the printhead interface to avoid any errors relating to poor printhead contact.
- Alcohol should only be used as a last resort as it can damage the printhead seals! If you use alcohol, 3 water flushes are needed to purge the printhead fully!
- Recommended circulation times: Alcohol: 5-10 minutes. Without alcohol: 15 minutes.
- The water will get lighter as the ink breaks down, this is normal. If your clog is stubborn, an ultrasonic cleaner may help break it down.
- Put the printhead in hot water. Repeat until the printhead is reasonably clean. Change the cleaning water frequently.
- Wipe the printhead contacts and nozzles by hand to ensure these areas are dry.
- Before reinstalling the printhead, let it air dry for ~3-4 hours. Using a fan may speed this step up.
- (HP ONLY) Wait until the printhead is bone dry or you risk the calibration! While recoverable, this will be an expensive mistake, especially with non-XL carts (1/2 cart waste with non-XL, 1/4 with XL). Your printer will run a minor cleaning cycle after printhead installation ("printhead preparation"), but wastes far less ink.
- Once the printhead is satisfactorily dry, reinstall the printhed and ink in the printer. Plug the printer in.
- Authors' Note: When referring to "beyond CMYK+PK", I am referring to color sets such as CMYK+PK+GR, CMYK+PK+GR+Gloss Optimizer, CMYK+PK+GR+OR+Gloss Optimizer to name a few "common" combinations I have seen.
- For printers with colors beyond CMYK+PK, a more advanced test sheet that fully tests the printhead on these models is REQUIRED. I am not providing this. Consider using a reference photo set commonly used by photo labs or a photo you have taken personally on a high-end camera like the Sony Alpha series to test your printer.
- All ink cartridges must have ink left. If all else fails, add ink with a DYE OR PIGMENT BASE refill kit (Check your printer specs; getting this wrong leads to binding and permanent damage). Add ink to ANY low cartridge(s). FAILURE TO DO THIS MAY DAMAGE YOUR PRINTHEAD AND TOTAL OUT YOUR PRINTER.
- If you have a photo printer such as a 5-color model (CMYK+PK), print the test image as a photo program such as Photoshop, Photos (Mac) (or your preferred image viewer), forcing it to print in photo mode.
- After replacing the printhead, test the printer. Match the previous settings and check for improvement.