De Dietrich Oven Door Switch Replacement: DOP440XE11
ID: 181515
Description: Oven door switch failure. Symptom: The oven...
Steps:
- Before working on your oven, cut the power at the circuit breaker.
- To remove the built-in oven from its cabinet, open the oven door, remove the 2 small rubber pieces located on each vertical upright of the oven, and unscrew the 2 screws.
- Then, extract the oven by using the door and the side handles to help you.
- Left upright and rubber detail
- The top metal sheet is held in place by 2 Torx screws, one on the right and one on the left. Unscrew them and slide the sheet toward the back of the oven to remove it.
- The switch module is located to the right of the power board when facing the oven.
- BE SURE to note where each wire goes before unplugging the terminals from the module.
- To remove the module, open the oven door, unscrew the 2 Torx screws, and slide the module slightly toward the back.
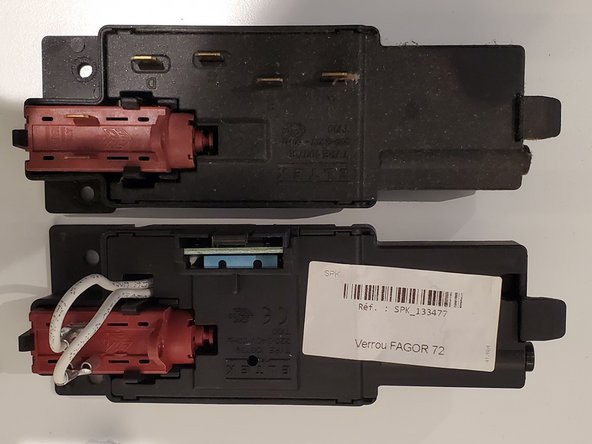
- This is where the difficulty begins, as the manufacturer modified the new part (The part number of the genuine part and that of the replacement part are nonetheless identical...)
- The genuine part had terminals, while the replacement part has a specific connector. It is therefore not possible to reconnect the wires to the new part without purchasing a small piece of special cable or by performing an adaptation that requires some soldering.
- The contacts, instead of being independent (terminals), have been grouped onto a printed circuit board. The part has also been significantly improved, as we note the presence of 2 micro-switches replacing the standard mechanical contactors.
- Unclip the module cover with a small flathead screwdriver. Do not force it too much to avoid breaking the plastic tabs.
- Remove the printed circuit board and desolder the 2 white wires going to the electromagnet (later, you will reconnect the terminals coming from the power board directly to the electromagnet).
- For each contact (Lock Contact, Door Contact, Common Phase), solder a piece of rigid electrical wire ending in a male terminal (automotive type) onto the printed circuit board.
- The schematics shown opposite will help you when reconnecting the terminals.
- To reassemble the module, it is important to have the oven door open (to avoid putting force on the plastic door detection latch).
- Properly reconnect all wires coming from the power board to the module terminals.
- The wire that previously connected terminals B to C on the original module is no longer necessary; you can cut it.
- For reference and to assist you with reconnection to the new module.
- Securing the control panel that tends to slide backward when you press the buttons on the front, making button presses ineffective or difficult.
- In my case, part of the plastic support that holds the circuit board was broken.
- Use plastic zip ties to prevent the circuit board from sliding backward.