Guide 1: Installing 230V LED Strip in kitchen cabinet. (Aluminum profiles, 45º cut)
ID: 182281
Description:
Steps:
- A document I am creating in several parts, dedicated to the assembly of an LED strip mounted with aluminum profiles and a diffuser, powered directly by mains voltage (230V in Spain); in this step 1, we see the before and after of the furniture cavity.
- The aluminum profile serves several functions: it acts as a heat sink for the LED strip, provides mechanical protection, serves as decorative trim, and provides insulation against electrical contact with the edge of the LED strip where the power input is connected.
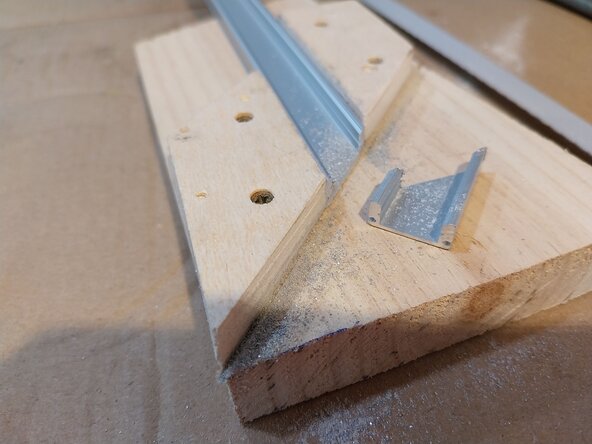
- For cutting the profiles, you have several options. One of them is to buy a 45º miter cutting support. Since I wasn't going to use it again for years and it was a tool to spend money on and then have to store, I decided to make a simple base for myself.
- Made with a piece of board and 2 pieces of wood strips cut at 45º with the help of a square or a set square (like those used in technical drawing), it didn't take me more than 15 minutes to make; I used wood scraps I had.
- It is made as a custom support for the aluminum profile I used. If you have enough board, my advice is to use a slightly larger board. And just like what you see on the left, do the same on the right, so you will have a second support point for the aluminum profile, which will be a great help.
- I could have cut the bottom wooden piece a little longer; for the next one I have to make, I will do it that way, and it would improve the support point.
- Profile views of the aluminum placed on the stand and already miter-cut with a hacksaw.
- When using a mount as small as the "improvised" one in my case, you need someone else to help hold the aluminum profile steady so it doesn't wobble.
- To cut the other side at 45º, we have 2 options: the 1st one, which I chose, is to turn the profile over and cut it upside down.
- 2nd Option: have made a 45º miter support, the inverse of the one we have already made, which is why in step 2 I advised you to use a slightly larger support and do the same as what we have on the left side, doing it "as if it were a mirror view" on the right side.
- View of the 2 miter cuts, facing each other.
- As we measure and cut each piece, use pieces of electrical tape to hold them in place on each side.
- After cutting each piece, I recommend carefully and gently smoothing out the edges with a fine file to remove any sharp or pointed burrs.
- Before securing the profile to the furniture, while it is secured with tape, we will drill the through-hole for the cable; for this part, I recommend that someone helps you hold the profile.
- A hole of about 6 to 8 mm (not too small so the cable does not enter with difficulty, and not too large so the profile does not bend when drilling). The hole can be slightly larger than the hole we will make in the board after removing the aluminum profile (so it does not hinder the drilling work).
- Once drilled, we touch up the edges of the hole with a utility knife or a reamer and we can proceed to secure the profile.
- Once all the pieces are made, attach them to the furniture using double-sided tape specifically designed for LEDs (it's not cheap, but it's worth it as it is more heat-resistant), or alternatively, with countersunk screws. In my case, I preferred not to drill holes in the furniture with screws.
- Although the cable to be connected directly to the LED strip is not the one I have already prepared since it is very thick, and in document 2 you will see the one I used, which is much thinner and soldered to the strip, my advice is that you leave the cable long so you can work comfortably; it will remain hidden on the back of the furniture.
- END of Guide 1, cutting of the aluminum LED strip support profiles.
- Continue in GUIDE 2: https://es.ifixit.com/Gu%C3%ADa/Gu%C3%AD...