Samsung Gear Fit 2 Pro Replacement battery replacement
ID: 186306
Description: Safety instructions: When replacing the battery...
Steps:
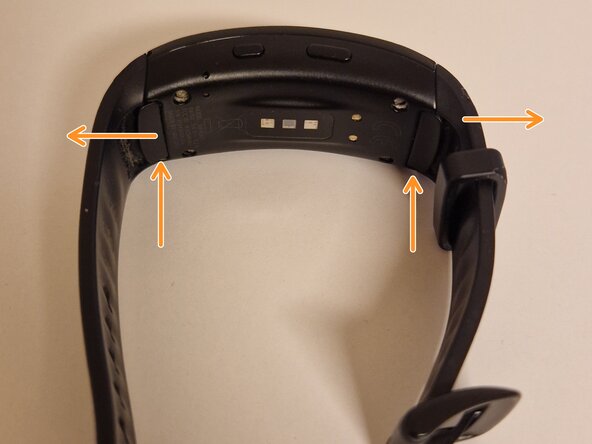
- Press the two latches on the watch bands outward with your fingers while pulling the band downward; the watch band should now release from the smartwatch.
- First, remove the four rubber screw covers (marked in red) using a pointed object such as a spudger or a toothpick to pry them out; you should now see the four Phillips screws.
- Use the PH00 screwdriver to unscrew these four screws, and be careful not to lose them.
- Now, gently pry the housing away from the display using a thin, flat tool (case opener, trimmed plastic card); start on the short sides, inserting the tool into the seam between the display and the housing, and then work your way toward the middle of the display.
- Attention: The housing is not glued and is only protected against water by a small gasket; be careful not to damage it during disassembly and press it back into position if it has detached from the housing.
- You can now see the motherboard; to avoid damaging the electronics, I recommend using a spudger as shown in the image. First, release the connection to the display (large connector); use your spudger on one of the short sides underneath the connector and pry it upward.
- Take care not to lose the 4 rubber bumpers (marked in orange) and ensure you put them back in position during reassembly later.
- Now, carefully pry the replacement battery connector upward using the spudger, as described previously for the display connector; use only a small amount of force.
- You can now carefully pry the motherboard out of the frame of the device; to do this, place your spudger against the motor PCB as shown in the image and push it slightly inward until it releases. Now, gently wiggle the PCB until it can be completely removed from the frame.
- When installing it later, ensure that the PCB sits flush on the frame again; if this is not the case, correct its position until it lies flush on the black frame.
- Your smartwatch should now be disassembled as shown in image 1.
- When working on the replacement battery, use only plastic tools to avoid damaging it (fire hazard).
- Place the spudger on the side opposite the replacement battery connector, as this is where there is the most space, and try to get the flat end slightly under the replacement battery. You can optionally add a little isopropyl alcohol (at least 90%) at the orange-marked points to make it easier to release the replacement battery.
- Now, repeatedly pry the replacement battery up a little bit and push your spudger further toward the replacement battery connector; the replacement battery should now continue to release.
- When you remove the replacement battery as shown in image 3, you can now install your new replacement battery; press it into the frame with light pressure so that the adhesive firmly secures the new replacement battery to the frame.