ASUS Chromebook C204MA Speakers Replacement
ID: 199145
Description: If your speaker is malfunctioning or not...
Steps:
- Close the lid and set the laptop with down the bottom facing up.
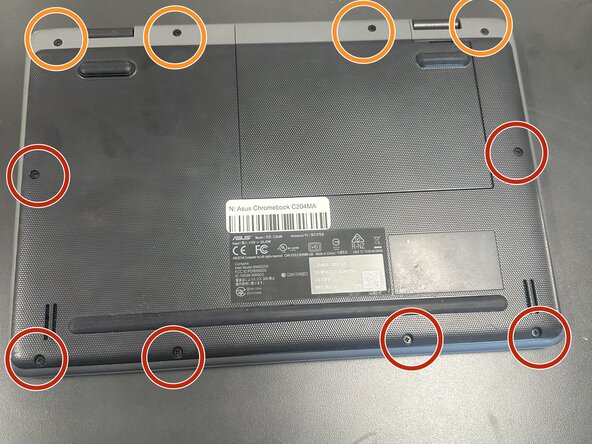
- Use a Phillips #0 screwdriver to remove the following screws:
- Six 6 mm-long
- Four 8 mm-long
- Lift and remove the panel.
- Inside the cable panel, remove the four Phillips #0 4 mm-long screws.
- Remove the black battery connector cover.
- Lift the flap securing the keyboard ribbon cable and disconnect the ribbon cable.
- Lift the locking flap securing the trackpad ribbon cable and disconnect the ribbon cable.
- Lift the locking flap securing the ribbon cable then disconnect the cable.
- Lift the locking flap and disconnect the ribbon cable.
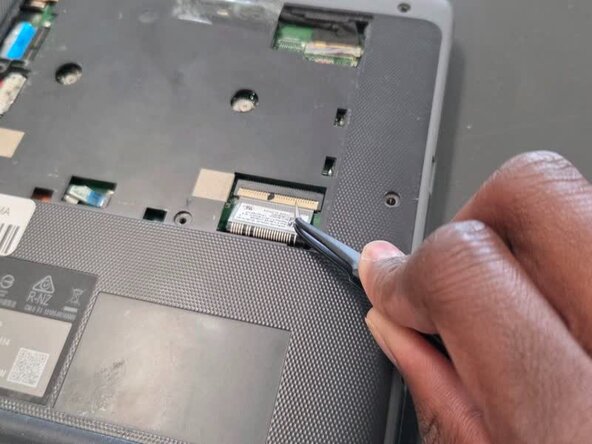
- Use tweezers to lift the orange press connector to disconnect it.
- Lift up the silver hinge securing the battery connector and disconnect the battery connector.
- Lift up the tape covering the display cable.
- Lift the locking bar securing the display cable.
- Disconnect the display cable.
- Remove the black foam piece.
- Disconnect the two coaxial cables.
- Flip over the laptop and open the lid to a full 180 degrees.
- Insert an opening pick into the seam between the palm rest assembly and chassis.
- Slide the opening pick around the perimeter until the palm rest assembly fully releases.
- Flip up the locking flap securing the touchpad ribbon cable.
- Disconnect the ribbon cable.
- Remove the palm rest assembly.
- Close the lid and set the laptop with down the bottom facing up.
- Use a Phillips #0 screwdriver to remove the following screws:
- Six 6 mm-long
- Four 8 mm-long
- Lift and remove the panel.
- Inside the cable panel, remove the four Phillips #0 4 mm-long screws.
- Remove the black battery connector cover.
- Lift the flap securing the keyboard ribbon cable and disconnect the ribbon cable.
- Lift the locking flap securing the trackpad ribbon cable and disconnect the ribbon cable.
- Lift the locking flap securing the ribbon cable then disconnect the cable.
- Lift the locking flap and disconnect the ribbon cable.
- Use tweezers to lift the orange press connector and disconnect it.
- Make sure to not let it fall back onto its port, it will reconnect.
- Lift up the silver hinge securing the battery connector and disconnect the battery connector.
- Lift up the tape covering the display cable.
- Lift the locking bar securing the display cable.
- Disconnect the display cable.
- Remove the black foam piece.
- Disconnect the two coaxial cables.
- Flip over the laptop and open the lid to a full 180 degrees.
- Insert an opening pick into the seam between the palm rest assembly and chassis.
- Slide the opening pick around the perimeter until the palm rest assembly fully releases.
- Remove the palm rest assembly.
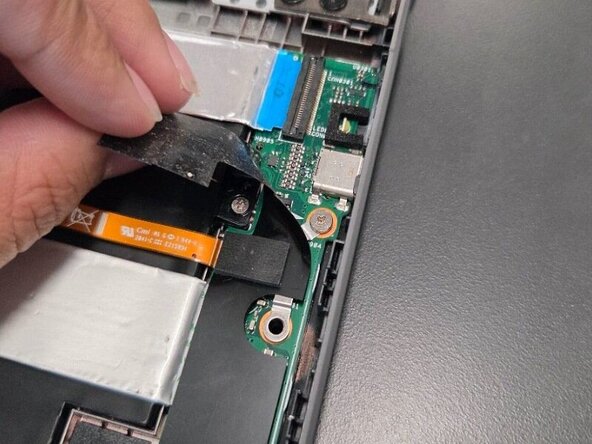
- On the I/O board on the right half of the laptop, lift the black mylar film and unscrew the single 4 mm-long Phillips #0 screw.
- Lift off the orange cable and black mylar film and set aside.
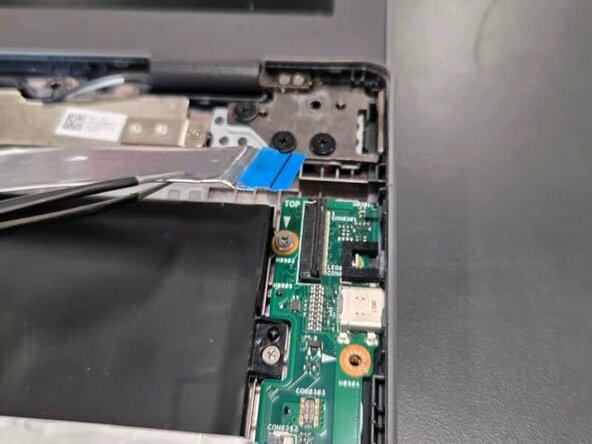
- Lift up the locking flap securing the I/O board ribbon cable and disconnect the cable.
- Lift up the locking flap securing the second I/O board ribbon cable and disconnect the ribbon cable.
- In order to remove the motherboard to reach closer towards the battery, these are the steps required.
- Remove the following screws with a Phillips screwdriver: two 5 mm-long black screws by the upper left of motherboard; one 4 mm-long sliver screw upper middle of the motherboard and one 4 mm-long sliver screw by the bottom left corner of motherboard.
- Unscrew two 4 mm-long sliver screws at the sliver thermal support bracket, located at the bottom left and middle right.
- Using your hands lift mother board slightly up and pull to the right slowly until motherboard is free.
- Upon removal of motherboard, move motherboard and left side speaker out of the way.
- Remove the three 4 mm-long sliver screws located on the right side of upper right portion of battery, bottom right portion of battery and far bottom left of battery (located next to speaker)
- Lift black tape on the bottom right side of the battery.
- Unravel black speaker cord across battery with tweezers.
- Remove the battery.
- Peel the tape and thread the Touchpad Cable through its slot.
- Gently lift the motherboard up and out.
- Lift and remove the black tape located to the bottom left of the speaker.
- Remove the black speaker cord by unravelling it against the bottom of the battery using the angled tweezers.
- Then lift up the black tape on the right side and remove the right bottom speaker.
- Remove the speakers.
- Flip over mother board and locate the speaker connector on the left speaker, highlighted in red.
- Remove plug by using the angled tweezers and pulling horizontally.