Whirlpool Duet Steam Dryer Wheel Replacement
ID: 199569
Description: The Whirlpool Duet/Steam Dryer This guide...
Steps:
- Unplug the laundry bin.
- Using the 1/4 nut bolt screwdriver, unscrew the two screws behind the dryer bin and give the top panel a shake to remove it. Place the panel on the towel lying on the floor or against the wall to prevent damage.
- Turn the screwdriver counter-clockwise (lefty-loosey) to loosen the screw and turn the screwdriver clockwise to tighten the screw (righty-tighty). Place the screws in the cup labeled 1 so that the screws do not get lost.
- Using a 1/4 nut screw driver, unscrew the two screws that are holding the electric panel in place.
- Place the electric panel against the wall on top of the dryer bin frame.
- Place the screws in cup labeled 2 so that the screws do not get lost.
- Using a 1/4 nut screw driver, unscrew the electric control system. The electric control system is the frame that has buttons to customize your dryer settings.
- Disconnect the wires from the electric control system by gripping the white connector and pulling the two halves apart.
- Remove the front panel which consists of the dryer door. Using the 1/4 nut screwdriver, unscrew the nuts and open the dryer door to remove the screw inside. Remove the screws with a Phillips head screwdriver
- Remove the lint catcher and set it aside with the top panel and electric control system.
- Give the front panel with the dryer door a shake and remove the front panel and set it aside on the towel with the top panel, electric control system, and lint catcher.
- Place the dryer panel with the door leaning against the wall with the towel underneath it to hold it in place to prevent slipping. Place these screws of the metal panel in the cup labeled 4 so that these screws do not get lost.
- Remember to wear handy gloves when removing the front panel, since there are some sharp parts to prevent cuts.
- Remove the visible metal frame that was blocking the electric control system from the wheel. Using a 1/4 screwdriver, unscrew the screws holding the metal panel.
- Take the metal panel off and place it on the side with the dryer top panel.
- Place these screws of the metal panel in the cup labeled 5 so that these screws do not get lost.
- Remove the metal panel in the front top of the dryer, by removing the metal frame that holds the lint catcher. Remove the screws with a 1/4 nut screwdriver.
- Use a flashlight on a little metal support piece to see underneath the metal panel.
- Disconnect the wire that connects to the metal frame that holds the lint catcher. Shake the metal panel to remove it and set the panel aside with the top panel, electric control system, front panel with the dryer door, and lint catcher.
- Place these screws of the metal panel in the cup labeled 5 so that these screws do not get lost.
- Disconnect the wire hanging out on the top of the base frame of the dryer from the electric panel.
- Remove the base frame of the dryer with the 1/4 nut screwdriver to reveal the metal wheel.
- Shake the base frame of the dryer to remove it. Place the base frame on the side on the towel with the other compartments.
- Place these screws of the metal panel in the cup labeled 6 so that these screws do not get lost.
- Label the wheel’s front and back. It is important to know when reassembling the dryer after replacing the broken wheel.
- Remember to wear handy gloves when removing the base frame of the dryer, since there are some sharp parts to prevent cuts.
- Flash a light underneath dryer to find the strap system. Release the strap to remove the metal wheel.
- Set the metal wheel aside along with the other components on the towel.
- Get assistance when taking out the wheel to prevent injuries and cuts! Remember to also wear the handy gloves to remove the wheel.
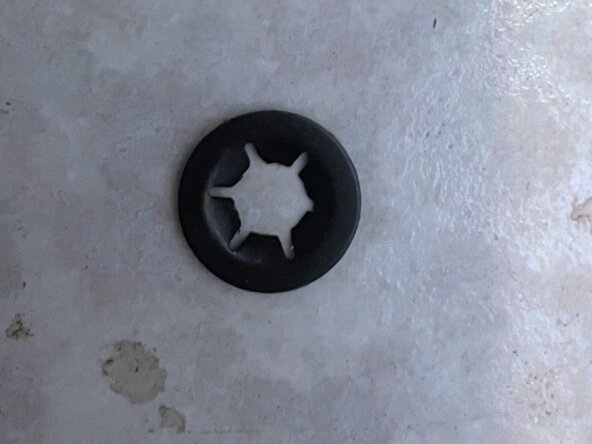
- Identify the small wheels and remove it. Disconnect the black ring that holds the wheel in place with a locking plier. For this model, the inner metal ring was worn out for one wheel.
- Remember to check the two wheels in the back and the two wheels at the base frame panel of the dryer by spinning them. The wheels need to be replaced if the spin is not smooth and there is a rocky sound.
- Insert the new wheel and place the new black ring on the front of the wheel to hold it in place.
- Spin the wheel to ensure it was properly inserted. The sound should not be rocky and the wheel should not shake.
- Vacuum the excess lint on the side and the bottom of the dryer.
- Thoroughly remove the lint as any lint buildup increases the chances of a fire igniting in the dryer.
- Attach the wheel back onto the dryer with the labeled front part facing forward.
- Remember to check the strap of the wheel to see if it is broken; if it feels really soft and weak, it is best to replace the strap.
- Attach the circular fuzzy part to the circular frame on the back of the wheel. Remember to go underneath the wheel to attach the strap back to the bottom frame of the dryer.
- Attach the base frame back onto the dryer. Using the 1/4 nut screw and the screws in cup 6, screw the base frame back onto the dryer.
- Give the metal wheel a spin to see if the wheel is spinning smoothly.
- Remember to feed the wire back to the middle of the base frame and connect it to the electric panel.
- Attach the metal frame that holds the lint catcher to the bottom part of the frame. Remember to also attach the metal bottom support system to support the metal frame with the screws in cup 5.
- Refer to back to Step 6 to see if the metal frame is connected properly and remember to connect the wire of the electric panel and the metal lint catcher again before proceeding to the next step.
- Screw back the top metal frame of the dryer with the screws from cup 5.
- Refer back to Step 5 to see how the metal frame should be placed and screwed back on.
- Attach the front panel frame with the door onto the dryer. With the 1/4 nut screwdriver, screw back the frame and remember to open the dryer door to use a Phillips screwdriver to tighten the screw in the middle. These screws are in cup 4.
- Refer to Step 4 to see how the front panel frame with the dryer door should be placed and screwed on. Remember to also place back the lint catcher in to the dryer once the front panel frame is attached.
- Reconnect the wires of the electric control system that has the different settings to the electric panel.
- Screw the electrical control system onto the electric panel.
- Remember to use a 1/4 inch screw. It is important to connect the wires from the electric control system to the electric panel tightly to ensure that both areas are connected.
- Secure the electric panel onto the dryer using a 1/4-inch screw.
- Connect the wires back together on the electric panel.
- Attach the top panel of the dryer back on with a 1/4 inch screw.
- Plug the dryer into an outlet and turn it on. The fast-fix project is complete! Congratulations!