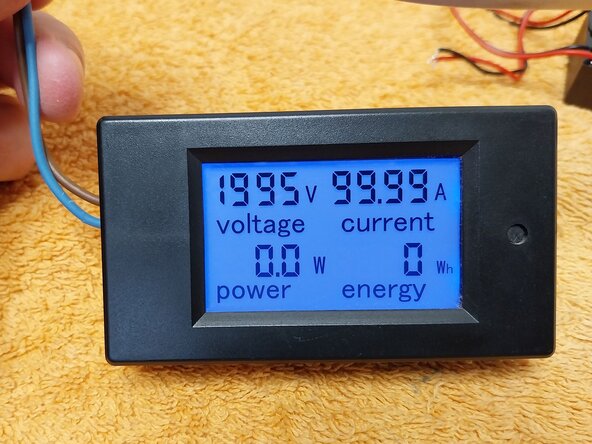
PEAZEFAIR PZEM-061 voltmeter reading incorrectly, measures 230V as 1995V
ID: 205462
Description:
Steps:
- After several years of working correctly, the PEAZEFAIR PZEM-061 panel voltmeter broke down overnight, starting to take incorrect measurements: it reads 230 V as 1995V and 99.99A, values that are completely impossible in a home.
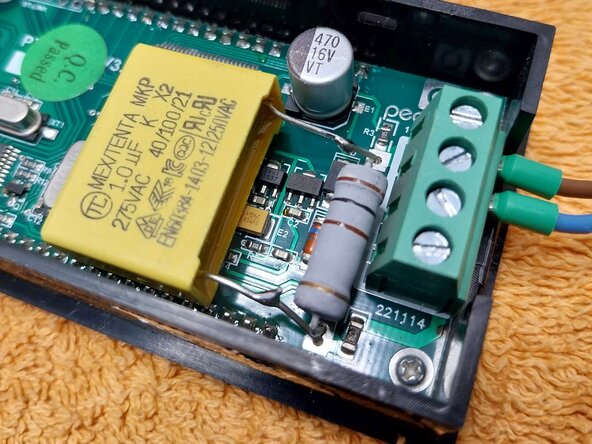
- View of the display powered at 230 V and view of the housing, with a back cover that is very easy to remove by prying; as soon as it is opened, we can see the main culprit of the failure, the 1 µF yellow capacitor (knowing that this is the one that fails comes from experience gained in other repairs of electronic equipment).
- Since the circuit was powered on moments ago, unplug it; PAY CLOSE ATTENTION, to measure the capacitor with a capacitance meter, we must ALWAYS ensure it is 100% discharged and has no voltage, so we will bridge its terminals with scissors, pliers, or a piece of wire; THIS IS BASIC TO AVOID BURNING OUT THE METER.
- Tested the 1 uF capacitor and it measures as .274 = 0.274 uF, so it is indeed faulty; this will be a very simple repair.
- Since the terminals are visible, replacing the capacitor is much simpler because they can be cut and a replacement capacitor can be soldered on without having to remove the PCB.
- View of how the 2 pieces of the terminal remain in order to solder the new replacement to them, making this a minimally invasive and very simple repair.
- I'm looking for a replacement in the capacitor box; I have the exact same one since it's a very common replacement part, and it even matches in color: 1 µF / 275V MKP.
- The replacement part has been checked, it is correct, it measures practically 1 uF, specifically 0.945 uF.
- My advice: Never trust a replacement part, even if it is new, if you have the means to measure it, measure it.
- Comparison of the broken part with the replacement and trimming of terminals; just out of curiosity, the new one from the same manufacturer and with the same value is slightly larger in size.
- With the replacement part positioned in the same place as the old one, I apply the two solder points.
- View of the final result.
- Before replacing the cover: Test the device; when powered at 241 V, it measures exactly the same as it did before the failure. In this home, the utility company voltage is higher than the 230 V standard.
- End of the Repair Guide.
- A very simple repair; a component failure that is very common in many devices. When you find a flat capacitor, either 1 uF 275V, 2.2 uF, or 3.3 uF, always be suspicious of them, as they are usually the cause of many failures that are simple to resolve.