Sony Digital 8 Video Walkman GV-D800 Head Drum Replacement
ID: 206098
Description: The Sony Digital 8 Video Walkman GV-D800 is a...
Steps:
- Remove the cover for the expansion port on the left side.
- Open the lid.
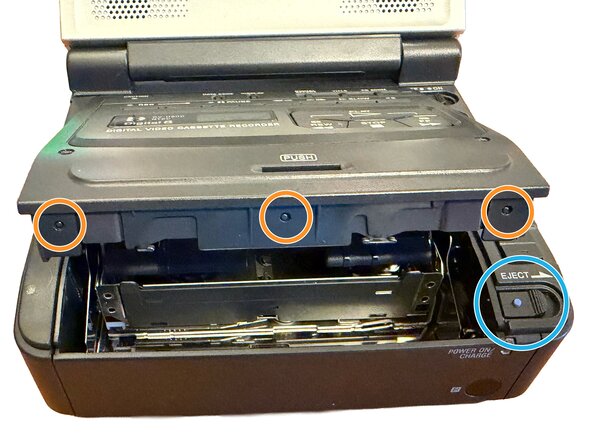
- Remove the 2x screws from the top of the cassette compartment.
- Press Eject to open the cassette compartment.
- Gently pull up on the top plastic to clear these three bumps that hold this part in place.
- Remove the case screw on the back.
- Remove the 5x screws on the bottom.
- Remove the bottom panel of the case.
- Remove 2x screws on the left side.
- Remove 1x screw for the battery compartment.
- Slide the battery connector downwards.
- Remove the 4x screws on the back of the device.
- Disconnect this connector.
- Remove these 2x screws.
- Remove these 3x screws.
- During reassembly, replace these screws before replacing the ribbons.
- Ribbon cables can be damaged easily. Take great care when removing these.
- Some of these ribbons slide into the connector, others have retaining clips that can be pulled up or out to release the ribbons.
- Remove the tape holding down the wires in this location (not pictured).
- Disconnect this connector first to access all connectors across the top.
- This connector should now be visible.
- Disconnect these ribbons.
- Lift the cassette mechanism up from the left side of the case.
- Take care to not damage the ribbons and wires.
- Remove these 2x screws. This allows you to lift the circuit board from the cassette mechanism.
- Remove these 2x screws from the front of the cassette mechanism.
- Remove these 2x screws from the back of the cassette mechanism.
- Slide the top part of the metal case to clear these clips.
- Set the top portion to the side.
- Remove these 3x screws from the bottom of the cassette mechanism.
- Remove the bottom metal portion of the cassette mechanism.
- Remove these three screws from the head drum.
- Remove these 2x screws. This gives enough clearance to lift the head drum out.
- Gently pull down on this plastic piece. Lift the old head drum out towards the top.
- When reassembling with the new head drum, take care when holding and placing to not damage the heads.
- To reassemble, follow the guide in reverse.