Altec Lansing Baby Boom No Sound but Have Lights
ID: 218974
Description: Are you having trouble with your Altec Lansing...
Steps:
- Strip/Remove the silicon protector/case and get ready your prying tool.
- Pry the steel mesh/screen from its sides (make sure not to pry too hard to avoid damaging the steel mesh).
- Note: Don’t worry, bending the steel mesh is unavoidable, later on you can use pliers to straighten the mesh back into its original form.
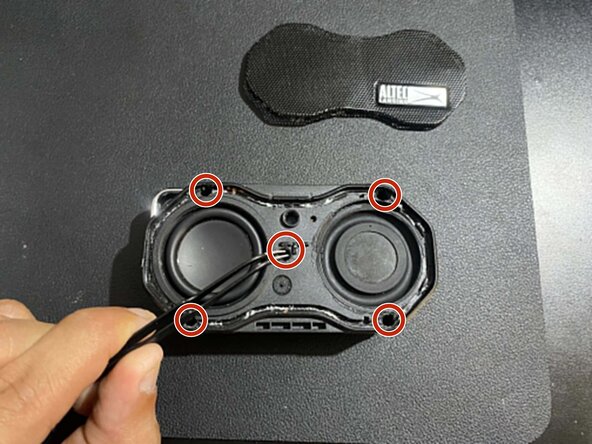
- Use your tweezers to remove/pull those 5 rubber seals encircled to reveal the screws.
- Note: At this point, by performing this step, you are actively voiding the warranty, and the waterproofing will no longer work, so proceed at your own risk.
- Use your phillips screwdriver (preferably magnetic) and unscrew all 5 screws.
- Turn the speaker on the other side and carefully use your prying tool to open the back of the speaker's cover.
- Note: Do not shove your prying tool too much to avoid hitting or damaging the circuit board inside.
- This should reveal the back of the circuit board and the battery.
- If you wish to proceed, using the phillips screwdriver, unscrew the 3 screws encircled and slowly lift the board from its place.
- Note: Do not use too much force to lift the board as it could break, watch the charging port and the buttons if you are having a hard time lifting the board.
- Congrats! you are done.
- Use a prying tool or just your hand to gently separate it from the case from the inside.
- Note: You will hear the glue or the rubber tearing off the plastic cover signifying you are doing it right.
- Observe the speaker and locate its terminal, look for 2 copper wires connecting the positive (red) and the negative (black) wires.
- Use your multi tester and set it to Ohm meter and place the probe to the copper wires you located on the speaker just like what I'm doing in the image.
- This way you will identify if the problem is a dead speaker or a loose terminal. If your multi tester do not read any resistance or zero (depends on your tester) it means that the speaker is dead and need replacing.
- If your multi tester show a value around 8 to 3 Ohms, therefore your speaker is fine and we will proceed to the next step.
- In this case, a loose positive (red) wire is what cause this problem.
- You may also test this by gently wiggling the wires to check if it is indeed loose or use your multi tester continuity test.
- Use your soldering iron to solder back the wire to the speaker's terminal.
- Note: You may add or remove the factory lead and solder a new lead yourself to secure the wires properly.
- Finally return everything and check the speaker by turning it ON and listen if there is the connecting sound.
- If it worked then congratulations!
- Note: If this still does not work, it could be the connection from the speaker to the circuit board itself, so make sure to check that as well. And if that is still not the case then it could be the circuit board components.